
A buyer approved our sample polo—perfect collar, smooth seams, vibrant color. Two months later, they called furious. Their 1,200-piece shipment had collar asymmetry on 80 pieces (left side 8 mm longer than right). I pulled the inspection records. Our sample used master operators (15+ years experience). Bulk production used line workers (average 2-3 years experience). Same pattern, same fabric—different execution consistency. The sample looked perfect because we hand-picked every stitch. Bulk production revealed the real capability. The buyer learned: approving a sample is not enough—you must inspect bulk consistency. We now recommend buyers check at least 80 random pieces from bulk (not factory-selected samples), measure left vs right collar points (should be within ±3 mm), and compare fabric hand feel across 5 different cartons (dye lot consistency). That one oversight cost them $2,400 in rework and 12-day delay. The lesson: sample beauty does not predict bulk reliability.
Inspecting golf polo shirt quality requires shifting focus from sample approval to bulk production consistency verification—where pre-shipment checks must reveal three critical gaps that samples hide: fabric consistency across dye lots measurable through side-by-side hand feel comparison and shade matching under natural light, construction symmetry detectable through left-right measurement differentials at collar points and sleeve lengths where ±3mm tolerance separates acceptable from defective, and workmanship durability testable through seam stress pulls at 15-pound force and button pull tests at 10-pound resistance—making effective inspection a comparison protocol between approved sample and randomly selected bulk pieces rather than a standalone checklist, with inline inspection at 30% production catching systematic errors when correction costs $2-3 per piece versus $8-12 at final stage, and mandatory wash testing of 5 sample pieces revealing shrinkage and color bleeding issues invisible in dry fabric evaluation before committing to full shipment acceptance.
I am Will from FUWAY. Over 12 years managing QC, I have designed inspection protocols that catch defects other factories hide. I have seen buyers lose $15,000-50,000 because they trusted beautiful samples without verifying bulk consistency. This guide shows you exactly what to check—and how to check it—before approving your shipment.
Quick Answers: Inspecting Golf Polo Shirts
Q: What critical checkpoint do buyers most often skip?
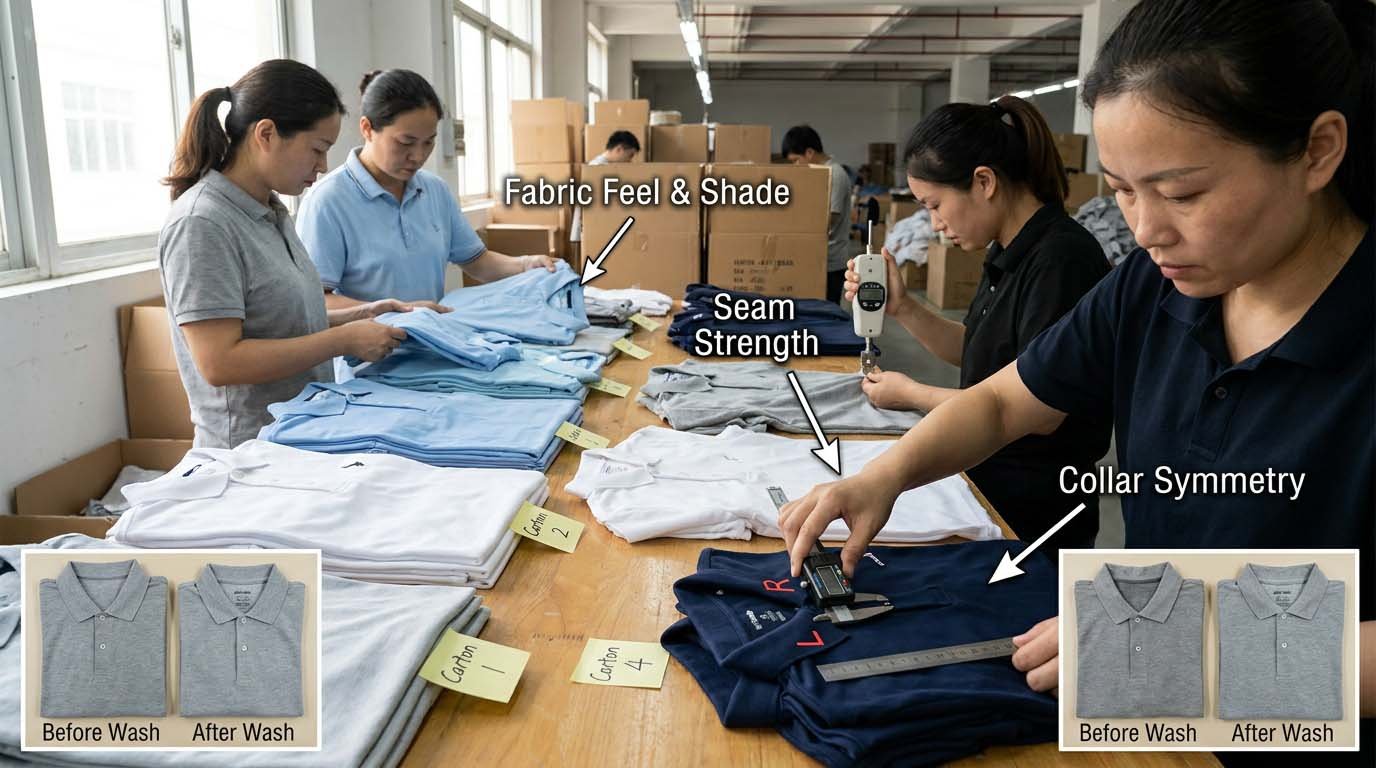
Collar symmetry—must measure left vs right collar point to center back; ≤3mm difference acceptable. Most skip this, leading to #1 customer complaint.
Q: How do I quickly check if bulk fabric matches my approved sample?
Always do a side-by-side hand feel and color (shade) match under daylight with both sample and bulk from different cartons. Small differences = possible fabric switch.
Q: Which measurements matter most, and what tolerances are realistic?
Key: Chest width (±2–3cm), length (±2cm), sleeve (±2cm), collar symmetry (±3mm). Too tight: high rejection, too loose: size complaints. Sample at least 10 pcs.
Q: How can I check if seams/stitching will hold up after washing?
Seam “pull test” at stress points (shoulders, underarm, side), plus wash 5 sample pieces for real shrinkage/puckering and colorfastness. Failure rate here signals major risk.
Q: When is inline inspection worth it versus just a final inspection?
For orders >800pcs, new suppliers, or complex designs: ALWAYS include inline (30–50%) plus final. Catches defects early—saves 60–80% rework cost and weeks of delay.
What to Inspect First: Fabric Handfeel, Knit Quality and Shade Consistency
Fabric inspection must prioritize three consistency checks before evaluating construction—hand feel comparison between approved sample and random bulk pieces detects yarn quality substitution where carded yarn replaced combed yarn or finishing treatments changed, knit structure examination reveals tension irregularities visible as wavy courses or distorted wales indicating machine calibration drift during extended production runs, and shade matching across multiple cartons exposes dye lot variations where color shifts by 10-15% between early and late production batches—making fabric verification the first checkpoint because defective fabric cannot be fixed through better sewing, requiring buyers to physically handle 5-10 bulk pieces from different cartons rather than trusting visual inspection alone, with side-by-side sample comparison under natural daylight the only reliable method for detecting subtle substitutions that factory QC may overlook or hide.
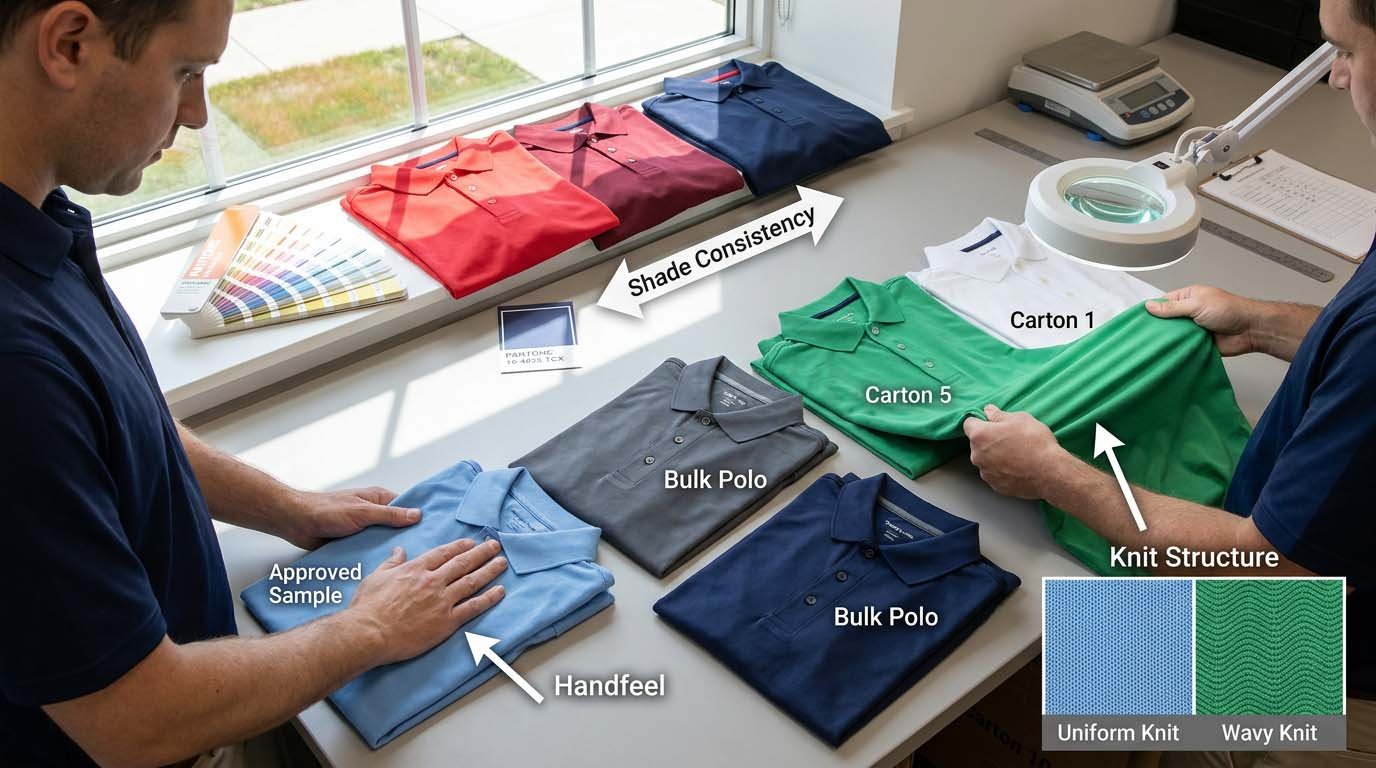
Hand Feel and Fabric Consistency Check
Why hand feel matters for golf polos:
Golf polos are worn 4-6 hours during play:
- Next-to-skin comfort critical (rough fabric causes irritation)
- Moisture management depends on fabric finish (enzyme wash improves wicking)
- Customer perception of quality (soft fabric = premium brand)
Hand feel components:
Yarn quality:
- Combed yarn: Smooth, soft (higher cost, +$0.60-1.00/unit)
- Carded yarn: Standard, slightly rough (lower cost, baseline)
- Ring-spun yarn: Premium, very soft (highest cost, +$1.20-1.80/unit)
Fabric finish:
- Enzyme wash: Softens fabric, removes fuzz (adds $0.30-0.50/unit)
- Resin treatment: Smooths surface, adds stiffness (some customers dislike)
- Silicone softener: Makes fabric slippery-soft (may interfere with moisture-wicking)
How factories substitute:
Sample stage:
- Use premium yarn (combed or ring-spun)
- Apply enzyme wash finish
- Result: Soft, luxurious hand feel
Bulk stage:
- Switch to standard yarn (carded, save $0.80/unit)
- Skip enzyme wash (save $0.40/unit)
- Total savings: $1.20/unit × 2,000 = $2,400 (factory pockets difference)
How to detect substitution:
Step 1: Retrieve approved sample
- Keep 2-3 pieces from original sample batch
- Store in plastic (prevent contamination from other fabrics)
Step 2: Select bulk pieces
- Randomly choose 5-10 pieces from different cartons
- Open sealed polybags (do not accept factory pre-selected pieces)
Step 3: Side-by-side comparison
- Rub sample fabric between fingers (feel texture)
- Rub bulk fabric between fingers (compare texture)
- Stretch sample, stretch bulk (compare elasticity recovery)
Pass criteria:
- Texture feels identical (same smoothness, same softness)
- Stretch recovery identical (fabric returns to shape at same rate)
Fail indicators:
- Bulk feels rougher (yarn quality downgrade)
- Bulk feels stiffer (finish treatment changed)
- Bulk feels thinner (lower GSM or looser knit)
Objective measurement (if possible):
- Cut 10 cm × 10 cm swatch from sample and bulk
- Weigh on digital scale (if available)
- Compare: Should be within ±5 GSM
If scale not available:
- Stack 5 sample pieces, measure thickness with ruler
- Stack 5 bulk pieces, measure thickness
- Compare: Should be within ±2 mm
Real scenario:
Order: 1,500 performance polos
Hand feel check:
- Sample: Soft, smooth
- Bulk (3 pieces): Noticeably rougher
Investigation:
- Sample fabric: Combed yarn, enzyme wash
- Bulk fabric: Carded yarn, no enzyme wash
Factory excuse: "Tech pack did not specify combed yarn"
Resolution:
- Factory re-processed 1,500 pieces with enzyme wash (added softness)
- Cost to factory: $600 (enzyme wash treatment)
- Delay: +4 days
Lesson: Always specify yarn type and finish treatment in tech pack—do not assume factory will match sample.
Knit Structure and Tension Check
Why knit quality matters:
Polo shirts use piqué or jersey knit:
- Piqué: Textured surface, breathable (raised diamond/honeycomb pattern)
- Jersey: Smooth surface, stretchy (common for performance polos)
Knit defects:
- Loose tension: Fabric sags, loses shape
- Tight tension: Fabric stiff, restricts movement
- Irregular tension: Wavy courses (horizontal lines), distorted wales (vertical columns)
How to inspect knit structure:
Visual check:
- Hold fabric up to light (backlit inspection)
- Look for: Uniform knit pattern (courses and wales evenly spaced)
Pass: Consistent pattern, no distortion
Fail indicators:
- Wavy courses: Horizontal lines bow or curve (tension inconsistent)
- Dropped stitches: Missing loops (fabric will unravel)
- Ladder runs: Vertical line of broken stitches
Stretch recovery test:
Step 1: Stretch fabric 20-30%
- Pull fabric widthwise (perpendicular to wales)
- Hold for 5 seconds
- Release
Step 2: Observe recovery
- Fabric should return to original shape within 2-3 seconds
- No permanent deformation (stretched area should match unstretched area)
Pass: Fabric recovers fully
Fail: Fabric stays stretched (poor elasticity, cheap yarn)
Common knit defects in golf polos:
Pilling (fabric balls):
- Cause: Loose fibers rub together during wear
- Inspection: Rub fabric against itself 20 times (simulate wear)
- Pass: No visible pills or pills <1 mm
- Fail: Pills >2 mm (low-quality yarn)
Snags:
- Cause: Pulled yarns disrupt knit structure
- Inspection: Visual scan of fabric surface on 10 random pieces
- Pass: No snags or snags <3 mm
- Fail: Snags >5 mm (fabric will unravel)
I have rejected batches: Where 20% of pieces showed irregular knit tension (wavy courses). Cause: machine maintenance neglected, tension varied across 4-hour production run. Factory re-knit fabric ($4,500 material waste), delayed shipment 14 days.
Shade and Color Consistency Verification
Why shade matching matters:
Dye lot variations cause:
- Visible color difference within one order (some pieces lighter, some darker)
- Customer complaints ("These don't match—did you send me returns?")
- Retail rejection (stores refuse mixed-shade inventory)
How dye lot issues happen:
Fabric dyeing in batches:
- Batch 1: Dyed on Monday (temperature 130°C, time 45 minutes)
- Batch 2: Dyed on Wednesday (temperature 128°C, time 47 minutes)
- Result: 2-5% color difference (barely noticeable in warehouse, obvious in natural light)
Factory uses multiple batches:
- Order 2,000 polos
- Requires 3 fabric rolls (different dye batches)
- If not matched: Customer receives mixed-shade order
How to check shade consistency:
Step 1: Select pieces from different cartons
- Carton 1, 5, 10, 15, 20 (spread across production)
- Pull 1-2 pieces from each
Step 2: Natural light comparison
- Take pieces outside (or near window)
- Lay side by side on neutral surface (gray or white)
- View under daylight (not fluorescent lights—they mask color differences)
Step 3: Panel-to-panel check
- Within one polo: Compare front panel, back panel, sleeves
- Should match (no visible shade difference)
Pass criteria:
- All pieces appear same color
- No visible lightness/darkness difference
Fail indicators:
- Some pieces noticeably lighter/darker
- Undertone shifts (navy with greenish tint vs navy with bluish tint)
- Panel mismatch (front darker than back on same polo)
Objective measurement (for disputes):
Use Pantone color swatch or spectrophotometer (if available):
- Measure sample (record color code or ΔE value)
- Measure bulk pieces
- Compare: ΔE difference should be <2.0 (imperceptible to eye)
- ΔE 2.0-3.5: Noticeable upon close inspection
- ΔE >3.5: Obvious color difference (reject)
Real shade matching failure:
Order: 3,000 performance polos, royal blue
Inspection (10 pieces from different cartons):
- 7 pieces: Rich royal blue (match sample)
- 3 pieces: Noticeably lighter (washed-out appearance)
Investigation:
- Fabric from 2 different dye lots
- Lot A: Standard dyeing (matches sample)
- Lot B: Under-dyed (dye concentration 12% lower)
Action:
- Segregate Lot B pieces (580 pieces affected)
- Factory re-dyed to match Lot A
- Cost: $1,740 (re-dyeing + labor)
- Delay: +8 days
I perform shade matching: On every order >1,000 units during inline inspection. If I see shade variation, I halt production and demand fabric segregation before continuing.
Fit & Measurements: How to Measure Polos and Set Realistic Tolerances
Accurate polo measurement requires standardized methodology where fabric is laid flat without stretching, measurements taken at specific anatomical reference points using consistent tool placement, and realistic tolerances applied based on knit fabric's inherent stretch variability—where ±2-3 cm chest tolerance accounts for fabric relaxation between cutting and assembly while ±2 cm length tolerance accommodates hem folding precision limits, making measurement the most disputed quality checkpoint because buyers often use inconsistent techniques that yield false failures, requiring pre-production agreement on measurement diagrams showing exact tape measure placement for each specification point to prevent post-delivery conflicts over garments that meet factory measurement standards but fail buyer's improper measurement protocol.
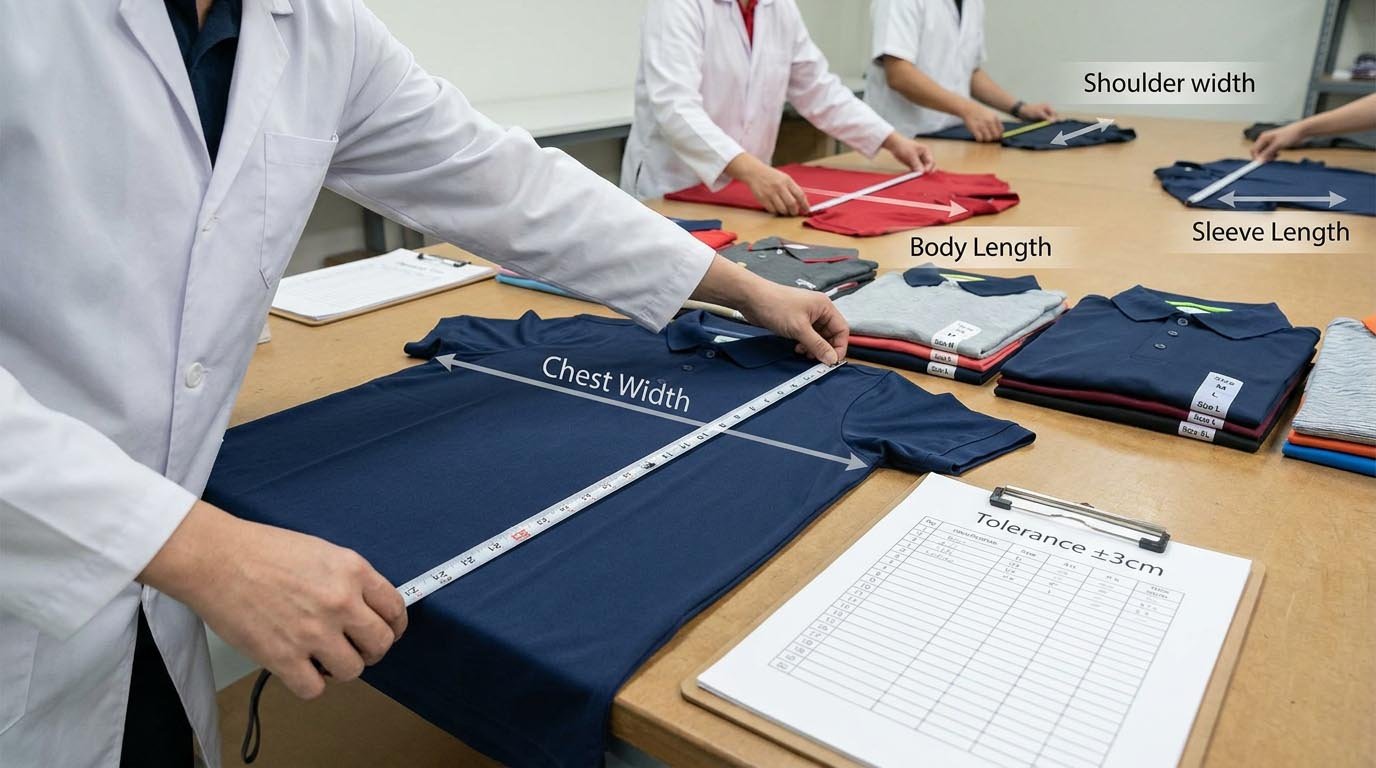
Critical Measurement Points and How to Take Them
Essential measurements for golf polos:
1. Chest width (most critical):
How to measure:
- Lay polo flat on hard surface (table, not bed—soft surface distorts)
- Smooth fabric (remove wrinkles, do not stretch)
- Locate armhole seam (where sleeve attaches to body)
- Measure 1 inch below armhole (widest part of chest)
- Straight line armpit to armpit
- Multiply by 2 if tech pack specifies "full chest" (some specs use half-chest)
Common mistakes:
- Measuring at waist (narrower, gives false small reading)
- Stretching fabric during measurement (increases reading by 3-5 cm)
- Measuring on curved surface (bed or draped on table edge—distorts measurement)
Tolerance: ±3 cm (standard), ±2 cm (premium/tight fit)
2. Body length:
How to measure:
- Start point: High point shoulder (where collar attaches to body at shoulder seam)
- End point: Bottom hem, center back
- Keep tape measure straight along center back seam (do not curve around body)
- Polo must be flat (not hanging, not draped)
Common mistakes:
- Measuring from neck base instead of high point shoulder (reads 2-3 cm shorter)
- Measuring along side seam (curved, gives false reading)
- Including collar in measurement (collar height should not be counted)
Tolerance: ±2 cm
3. Sleeve length:
How to measure:
- Start point: Shoulder seam (where sleeve attaches to body)
- End point: Sleeve cuff edge, center of sleeve
- Measure along center line of sleeve (not underarm curve, not top curve)
Common mistakes:
- Measuring from neck instead of shoulder seam
- Measuring along underarm (longer due to curve)
- Not flattening sleeve before measuring
Tolerance: ±2 cm
4. Shoulder width:
How to measure:
- Shoulder seam to shoulder seam (where sleeves attach)
- Straight line across back
- Polo laid flat, face down
Tolerance: ±1.5 cm
5. Collar dimensions (golf polo specific):
Collar width (left/right points):
- Measure from collar tip to center back neck seam
- Measure both left and right sides
- Compare: Difference should be ≤3 mm
Collar height (standing collar):
- Fold collar up (as worn)
- Measure height from base to top edge, center back
- Tolerance: ±3 mm
Measurement sample size:
Minimum: 10 pieces per size (if order has multiple sizes)
Example: 1,000-piece order
- Size M: 400 pieces → Measure 10 pieces
- Size L: 400 pieces → Measure 10 pieces
- Size XL: 200 pieces → Measure 10 pieces
- Total measured: 30 pieces (3% of order)
Better: 20 pieces per size (if high-value order or new supplier)
Measurement recording:
Create measurement table:
| Piece # | Size | Chest | Length | Sleeve | Shoulder | Within Spec? |
|---|---|---|---|---|---|---|
| 1 | M | 98 | 70 | 23 | 44 | YES |
| 2 | M | 101 | 72 | 24 | 45 | YES |
| 3 | M | 97 | 69 | 23 | 43 | YES |
| ... | ... | ... | ... | ... | ... | ... |
| 10 | M | 99 | 71 | 24 | 44 | YES |
Calculate average: (98 + 101 + 97 + ... + 99) / 10 = 99.2 cm (example)
Compare to spec: Spec 100 cm ± 3 cm → Acceptable range 97-103 cm → 99.2 cm PASS
Setting Realistic Tolerances Based on Construction
Why tolerances matter:
Too tight tolerances (±1 cm):
- Reality: Knit fabric stretches 2-5% between cutting and sewing
- Result: 60-80% of pieces fail measurement (even though they are actually correct)
- Cost: Excessive rework ($3-5/piece to re-cut and re-sew)
Too loose tolerances (±5 cm):
- Reality: Chest 95-105 cm all acceptable for "Size M 100 cm spec"
- Result: Customer receives inconsistent sizing (fit varies significantly)
- Returns: 15-25% due to fit complaints
Realistic tolerance factors:
Fabric type affects tolerance:
Piqué (stable knit): ±2 cm achievable
- Minimal stretch after cutting
- Holds shape well during sewing
Jersey (stretch knit): ±3 cm realistic
- Fabric relaxes after cutting (shrinks 1-2%)
- Stretch during sewing (operators must control tension)
Performance jersey (high spandex): ±3-4 cm realistic
- Stretches significantly during handling
- Difficult to control (requires skilled operators)
Garment construction affects tolerance:
Simple polo (no side panels): ±2-3 cm achievable
- Fewer seams = fewer stretch points
Complex polo (color-blocked panels): ±3-4 cm realistic
- Multiple seams = more opportunities for variation
- Panel stretching during assembly adds variability
Industry standard tolerances:
| Measurement | Budget Polos | Mid-Range | Premium |
|---|---|---|---|
| Chest | ±4 cm | ±3 cm | ±2 cm |
| Length | ±3 cm | ±2 cm | ±1.5 cm |
| Sleeve | ±3 cm | ±2 cm | ±1.5 cm |
| Collar | ±5 mm | ±3 mm | ±2 mm |
Real tolerance scenario:
Buyer specified: Chest 100 cm ±1 cm (tight tolerance)
Production result (50 pieces measured):
- Within 99-101 cm: 18 pieces (36%)
- 97-99 cm or 101-103 cm: 28 pieces (56%)
- Outside 97-103 cm: 4 pieces (8%)
Under ±1 cm tolerance: 64% failed (only 36% passed)
Under ±3 cm tolerance: 92% passed (only 8% failed)
Factory feedback: "±1 cm tolerance is unrealistic for jersey knit—even luxury brands use ±2 cm"
Resolution:
- Buyer agreed to ±2.5 cm (compromise)
- Re-inspection: 88% passed
- Only 6 pieces required rework
I advise buyers: Use ±3 cm for chest/sleeve, ±2 cm for length as baseline. Tighten to ±2 cm only if ordering premium polos for high-end retail and accepting 10-15% higher cost for added precision.
Workmanship & Trims: Collars, Plackets, Seams, Buttons and Side Vents
Workmanship inspection requires systematic examination of stress points where construction failures manifest—collar symmetry and puckering detectable through side-by-side left-right comparison and flat-lay ripple check, placket alignment verified by button-to-buttonhole registration with ±3mm tolerance, seam quality evaluated through visual skip detection and 15-pound stress pull at underarm and side seams, button attachment tested through 10-pound pull resistance to prevent premature detachment, and side vent symmetry measured to ensure equal left-right lengths within ±5mm—making workmanship evaluation the most time-intensive checkpoint because each inspection point requires physical manipulation rather than visual scan, with defect distribution across multiple cartons revealing whether issues are isolated operator errors or systematic production problems requiring batch-wide rework versus selective replacement.
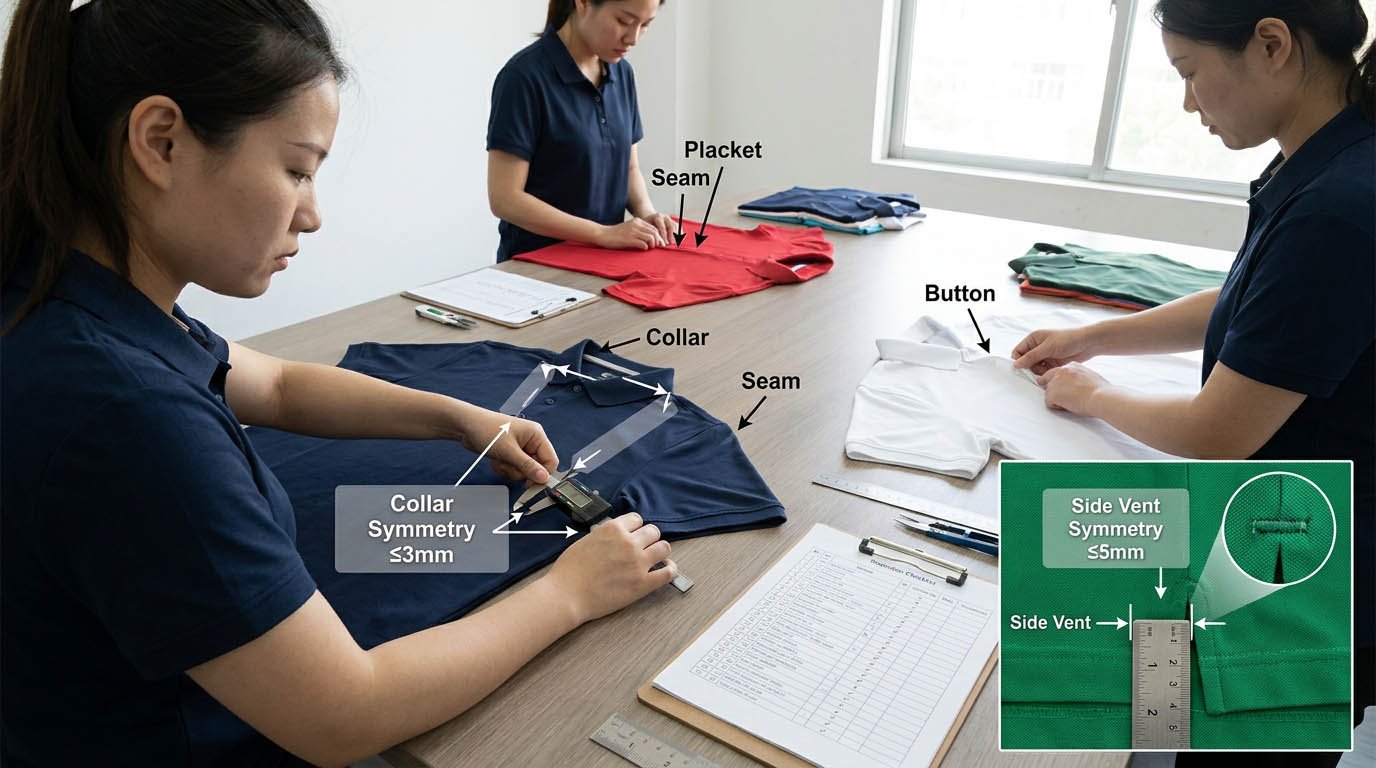
Collar Quality and Symmetry Check
Why collar is the most critical workmanship point:
Customer notices collar first:
- Visible when worn (framing the face)
- Touched frequently (adjusting collar position)
- Affects professional appearance (asymmetric collar looks cheap)
Common collar defects:
1. Collar asymmetry (left vs right length difference):
How to check:
- Lay polo flat, face up
- Smooth collar (do not stretch)
- Measure from collar point to center back neck seam (both left and right)
- Compare: Difference should be ≤3 mm
Example:
- Left side: 165 mm
- Right side: 168 mm
- Difference: 3 mm → PASS
Defect: Difference >5 mm → FAIL (visible asymmetry)
2. Collar puckering (rippling at edges):
How to check:
- Lay polo flat
- Look at collar edges (should lie flat)
- Rippling indicators: Fabric waves or curls upward
Acceptable: Minor rippling <2 mm (pressing will flatten)
Defect: Rippling >3 mm (permanent, cannot flatten)
Cause: Collar band tension too tight during sewing
3. Collar curling (collar tips curl up):
How to check:
- Fold collar down (as worn)
- Check if collar tips stay flat or curl upward
Acceptable: Collar tips lie flat or slight natural curve
Defect: Collar tips curl up >5 mm (cheap appearance)
Cause: Insufficient interfacing (stabilizer fabric inside collar) or poor pressing
Collar inspection sample size:
Check collar on ALL measurement samples (if measuring 10 pieces, check all 10 collars)
Additional check: Randomly inspect 10 more collars (total 20 collars checked)
Acceptable failure rate: ≤2 pieces with collar defects in 20 checked (10% rate)
If >3 pieces fail: Flag for 100% collar inspection
Real collar defect scenario:
Order: 1,200 golf polos
Inline inspection (at 400 pieces produced):
- Collar check on 20 pieces
- 6 pieces: Collar asymmetry >5 mm
- Failure rate: 30% (unacceptable)
Investigation: Operator inexperience—Line 2 operator (2 weeks experience) did not align collar properly
Action:
- Halt Line 2 production
- Re-train operator
- Re-work 400 pieces already produced (replace collars on 120 defective pieces)
- Cost: 120 × $8 = $960
If caught at final inspection:
- 1,200 pieces × 30% = 360 defective
- Rework cost: 360 × $10 = $3,600 (harder to fix after full assembly)
I check collars: During inline inspection on every order. Collar defects are #1 customer complaint—catching them early saves $2,000-5,000 in final-stage rework.
Placket Alignment and Button Quality
Placket function:
Button placket on golf polos:
- 2-button, 3-button, or 4-button design
- Must align perfectly (buttons line up with buttonholes)
- Affects functionality (buttons difficult to fasten if misaligned)
Placket defects:
1. Button misalignment:
How to check:
- Button the polo completely
- Look at placket from top to bottom
- Check: Do edges line up evenly?
Pass: Placket edges align within ±3 mm
Defect: Edges offset >5 mm (one side protrudes)
Cause: Buttonhole placement error or placket sewing misalignment
2. Button attachment strength:
How to check:
- Grasp button between thumb and forefinger
- Pull firmly (not yanking—simulate 10 pounds force)
- Hold for 5 seconds
Pass: Button does not move, thread stays tight
Defect: Button wobbles or thread pulls through fabric
Industry standard: Button must withstand 10-pound pull test
3. Buttonhole quality:
How to check:
- Examine buttonhole stitching (should be dense, uniform)
- Insert button through hole (should fit snugly but pass through)
Pass: Buttonhole fully stitched, no loose threads, button fits correctly
Defect: Buttonhole stitching skips (gaps >2 mm) or buttonhole too large (button slips through easily)
4. Placket puckering:
How to check:
- Lay polo flat, button fastened
- Look at placket area
- Rippling indicators: Fabric gathers along placket edges
Pass: Placket lies flat
Defect: Visible rippling >3 mm (cannot be pressed flat)
Cause: Placket band tension during sewing
Button and placket inspection:
Sample size: Check on all measurement samples (10-20 pieces)
Additional: Pull-test buttons on 10 random pieces (total 30-40 buttons tested if 3-button polo)
Acceptable failure rate: ≤1 button fails pull test per 10 pieces tested
Real placket defect scenario:
Order: 1,500 performance polos, 3-button placket
Final inspection:
- Button pull test on 30 pieces (90 buttons total)
- 12 buttons failed pull test (wobbled under 10-lb force)
- Failure rate: 13%
Investigation: Thread tension too loose on button attachment machine
Action:
- 100% button inspection (all 1,500 × 3 = 4,500 buttons checked)
- Found: 580 loose buttons total (13% across batch)
- Rework: Re-attach 580 buttons
- Cost: 580 × $0.50 = $290
I have learned: Button pull test is critical but often skipped by buyers (time-consuming). But loose buttons are #2 customer complaint after collar issues—worth the inspection time.
Seam Quality and Stitch Integrity
Critical seams on golf polos:
Underarm seam (highest stress):
- Connects sleeve to body
- Stretches during golf swing (arm raises 180 degrees)
- Most likely to fail if stitching weak
Side seam:
- Connects front and back panels
- Stress when tucking shirt into pants
Shoulder seam:
- Stress during putting on/taking off
- Less critical than underarm, but still important
Hem seam:
- Bottom edge
- Lower stress, but visible (affects appearance)
Seam inspection checkpoints:
1. Stitch skip (gaps in stitching):
How to check:
- Visual inspection of seam line
- Look for gaps where stitches are missing
Pass: No gaps, or gaps <5 mm (acceptable)
Defect: Gap >3 cm (seam will fail under stress)
2. Seam puckering:
How to check:
- Run finger along seam (should feel smooth)
- Rippling: Fabric gathers along seam line
Pass: Smooth seam, no rippling
Defect: Visible rippling >3 mm
Cause: Tension imbalance (needle thread too tight, bobbin thread too loose)
3. Seam strength (stress pull test):
How to check:
- Grasp fabric 2 inches on each side of seam
- Pull firmly (simulate 15 pounds force)
- Hold 5 seconds
Pass: Seam holds, no thread breaking, no fabric separating
Defect: Thread breaks or seam opens
4. Stitch density:
How to check:
- Count stitches per inch (SPI) along 1-inch seam section
- Use ruler to mark 1-inch span
Spec: 12-14 SPI for standard polos, 14-16 SPI for performance polos
Pass: Stitch count within spec
Defect: <12 SPI (weak seam) or >16 SPI (excess thread, may pucker)
Seam inspection sample size:
Check seams on: 10-20 pieces (same pieces used for measurement)
Focus on: Underarm seams (highest failure risk)
Perform stress pull on: 5 underarm seams (from 5 random pieces)
Real seam defect scenario:
Order: 2,000 stretch performance polos
Stress pull test (5 pieces):
- 3 pieces: Seams held firmly
- 2 pieces: Underarm seam partially opened (3-stitch break, 8 mm gap)
Investigation: Stitch density only 10 SPI (should be 14 SPI for stretch fabric)
Action:
- Factory re-adjusted all machines to 14 SPI
- 100% seam inspection on already-produced 600 pieces
- Found: 48 pieces with weak seams (8% rate)
- Rework: Re-stitch underarm seams
- Cost: 48 × $5 = $240
I perform seam stress pulls: On every inline inspection. Weak seams cause garment failures after 2-3 washes—customers return within 1 month, damaging brand reputation.
Side Vent Construction and Hem Finish
Side vents (side slits at hem):
Purpose:
- Allow freedom of movement (polo does not ride up when bending)
- Style feature (classic polo design element)
Side vent defects:
1. Asymmetric vent lengths:
How to check:
- Measure left side vent from hem edge to top of slit
- Measure right side vent
- Compare: Difference should be ≤5 mm
Pass: Vents equal length within 5 mm
Defect: One vent >10 mm longer than other (visible asymmetry)
2. Vent reinforcement (bar tack):
How to check:
- Top of each vent should have reinforcement stitching (prevents tearing)
- Look for dense zigzag stitch (bar tack)
Pass: Bar tack present, 10-15 stitches across vent top
Defect: No bar tack or weak bar tack <5 stitches (vent will tear under stress)
3. Hem stitch quality:
How to check:
- Hem should be even width all around (typically 1-1.5 cm folded)
- Stitching straight, no waviness
Pass: Hem even, stitching straight
Defect: Hem width varies >5 mm (looks unprofessional)
I inspect side vents: On 10 random pieces per order. Side vent asymmetry is easy to miss (requires measurement) but customers notice immediately when wearing.
Logos & Decorations: Embroidery, Printing and Badges—Defect Checks
Logo decoration inspection focuses on four critical consistency checks—embroidery stitch density and registration alignment where 12,000+ stitch logos require visual comparison between sample and bulk to detect density reduction or color misplacement exceeding ±2mm tolerance, print registration and durability where multi-color screen prints demand alignment verification and 5-piece wash testing to expose premature cracking or fading, badge attachment strength tested through 15-pound pull resistance at all four corners to prevent detachment during washing, and logo placement accuracy measured from collar seam to logo center ensuring ±5mm consistency across all pieces—making decoration the most disputed quality checkpoint because buyers judge brand identity by logo appearance while factories prioritize production speed over perfect replication, requiring side-by-side sample comparison with 5x magnification to detect substitutions invisible in casual inspection.
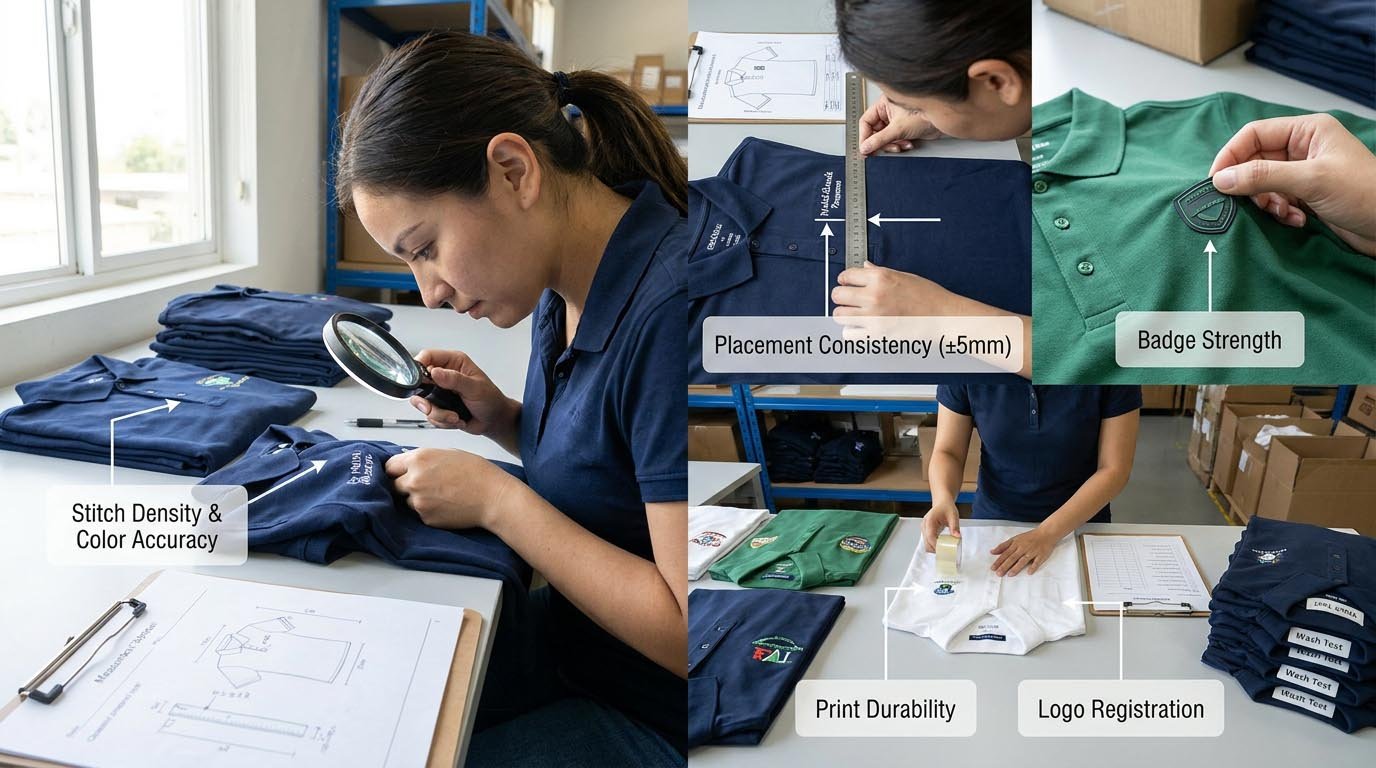
Embroidery Quality and Registration Check
Embroidery defects visible only on close inspection:
1. Stitch density reduction:
How to check:
- Place sample and bulk logo side by side
- Examine with 5x magnifying glass (or smartphone zoom camera)
- Look for: Gaps between stitches (bulk logo shows more fabric underneath)
Pass: Stitch density appears identical to sample
Defect: Visible fabric between stitches (density reduced)
Cause: Factory reduced stitch count to speed production (saves 20-40 seconds per logo)
Impact: Logo looks "fuzzy" or "cheap"
2. Thread color mismatch:
How to check:
- Compare sample and bulk logo colors under natural light
- Check each color separately (if multi-color logo)
Pass: Colors match (or imperceptible difference)
Defect: Visible color shift (navy darker/lighter, red more orange/pink)
Cause: Factory used different thread brand or dye lot for bulk
3. Registration error (multi-color logos):
How to check:
- Multi-color logos have layers (e.g., red background, white text on top)
- Check alignment: Does white text sit exactly on red background?
Pass: Colors align within ±2 mm
Defect: Color layers offset >2 mm (white text appears shifted, red background visible on one side)
Cause: Machine calibration drift during extended production
4. Thread fraying or loose ends:
How to check:
- Inspect logo edges (are threads trimmed cleanly?)
- Rub finger across logo (do threads snag on finger?)
Pass: Clean edges, no loose threads
Defect: Loose threads >5 mm or frayed edges
Cause: Poor trimming after embroidery
5. Puckering around logo:
How to check:
- Look at fabric around logo (should lie flat)
- Rippling: Fabric gathers around embroidery edges
Pass: Fabric flat, minimal distortion
Defect: Visible puckering >3 mm (fabric pulled tight by stitches)
Cause: Excessive stitch density or insufficient stabilizer backing
Embroidery inspection sample size:
Check logos on: 20 random pieces
Side-by-side comparison with sample: 5 pieces
Acceptable failure rate: ≤1 logo defect per 20 pieces (5%)
Real embroidery defect scenario:
Order: 1,500 corporate polos, embroidered company crest (3 colors)
Inspection (20 logos checked):
- 4 logos: Registration error (red layer shifted 3 mm, white text not aligned)
- Failure rate: 20%
Investigation: Machine calibration drifted after 500 logos (mid-production)
Action:
- Factory segregated affected 500 pieces
- 100% logo inspection on those 500
- Found: 98 defective logos total
- Rework: Re-embroider 98 logos (remove old, apply new)
- Cost: 98 × $4.50 = $441
I recommend: Check embroidery at inline inspection (30% production) to catch registration drift before it affects 500+ pieces.
Print Quality, Alignment and Durability
Print types on golf polos:
Screen printing: Most common (ink applied through screen mesh)
Heat transfer: Vinyl or digital print applied with heat press
DTG (direct-to-garment): Inkjet printing directly on fabric
Print defects:
1. Print registration (multi-color):
How to check:
- Multi-color screen prints require separate screens per color
- Check alignment: Do colors overlap correctly?
Pass: Colors align within ±2 mm, no gaps or overlaps
Defect: Colors offset >2 mm (one color layer shifted)
2. Ink adhesion:
How to check:
- Scratch print surface with fingernail (moderate pressure)
- Tape test: Apply masking tape to print, press firmly, peel off
Pass: Ink does not flake or peel
Defect: Ink chips or peels away
Cause: Insufficient curing (heat not applied long enough)
3. Print cracking (durability test):
How to check:
- Wash 5 sample pieces (per care label instructions)
- Examine print after wash: Look for cracks in ink
Pass: No visible cracks after 1 wash
Defect: Cracks appear (lines through ink layer)
Cause: Poor ink quality or wrong ink type for fabric (plastisol on high-stretch fabric cracks easily)
4. Print placement accuracy:
How to check:
- Measure from collar seam to print center (vertical)
- Measure from left placket edge to print center (horizontal)
- Compare across 10 pieces
Pass: Placement varies <5 mm
Defect: Placement varies >10 mm (logos appear crooked or off-center)
5. Color bleeding (multi-color prints):
How to check:
- Wash 5 sample pieces
- After wash: Check if colors bleed into each other (red bleeds into white)
Pass: Colors remain separated
Defect: Colors bleed (white areas show red tint)
Print inspection sample size:
Visual check: 20 pieces
Wash test: 5 pieces (from bulk, not samples)
I always wash-test prints: Before final approval. Print defects appear after washing, not before—skipping wash test means defects reach customers.
Badge and Patch Attachment Strength
Badges common on golf polos:
Woven badges: Club crests, brand logos (sewn onto chest)
Rubber/PVC badges: 3D logos (sewn or heat-sealed)
Badge defects:
1. Attachment strength:
How to check:
- Grasp badge edge with fingers
- Pull firmly (simulate 15 pounds force)
- Test all 4 corners (if rectangular badge)
Pass: Badge does not lift from fabric, stitching holds
Defect: Badge edge lifts or stitching tears through fabric
2. Badge placement:
How to check:
- Measure from collar seam to badge center
- Compare across 10 pieces
Pass: Placement varies <5 mm
Defect: Placement varies >10 mm (badges appear crooked)
3. Badge edge finish:
How to check:
- Inspect badge edges (should be sealed, not fraying)
Pass: Edges sealed, no loose threads
Defect: Edges fraying (threads coming loose from badge)
I have seen: Badges detach after 3 washes because factory used insufficient stitching (4 attachment points instead of spec 12). Badge attachment is permanent—if weak, customer must replace entire polo.
Sampling & Testing: AQL Plans, Inline/Final QC and Essential Lab Tests
Effective sampling protocols combine three inspection stages with lab testing to verify quality before shipment—inline inspection at 30-50% production using 20-40 piece samples catches systematic process errors when correction costs $2-3 per piece versus $8-12 at completion, pre-final inspection at 80-90% completion verifies size grading consistency across S-XXL ranges and detects dye lot variations requiring fabric segregation, final AQL inspection samples 80-125 pieces per ISO 2859-1 standards for accept/reject decisions with Critical/Major/Minor defect classification at 0/2.5/4.0 levels, and lab testing on 5 sample pieces validates wash shrinkage below 5%, color fastness Grade 4+ per ISO 105-C06, and pH 4.5-7.5 per AATCC 81 preventing skin irritation—making multi-stage inspection economically superior to single final check because early defect detection reduces total rework cost by 60-80% while lab testing prevents post-delivery failures that inspection alone cannot reveal.
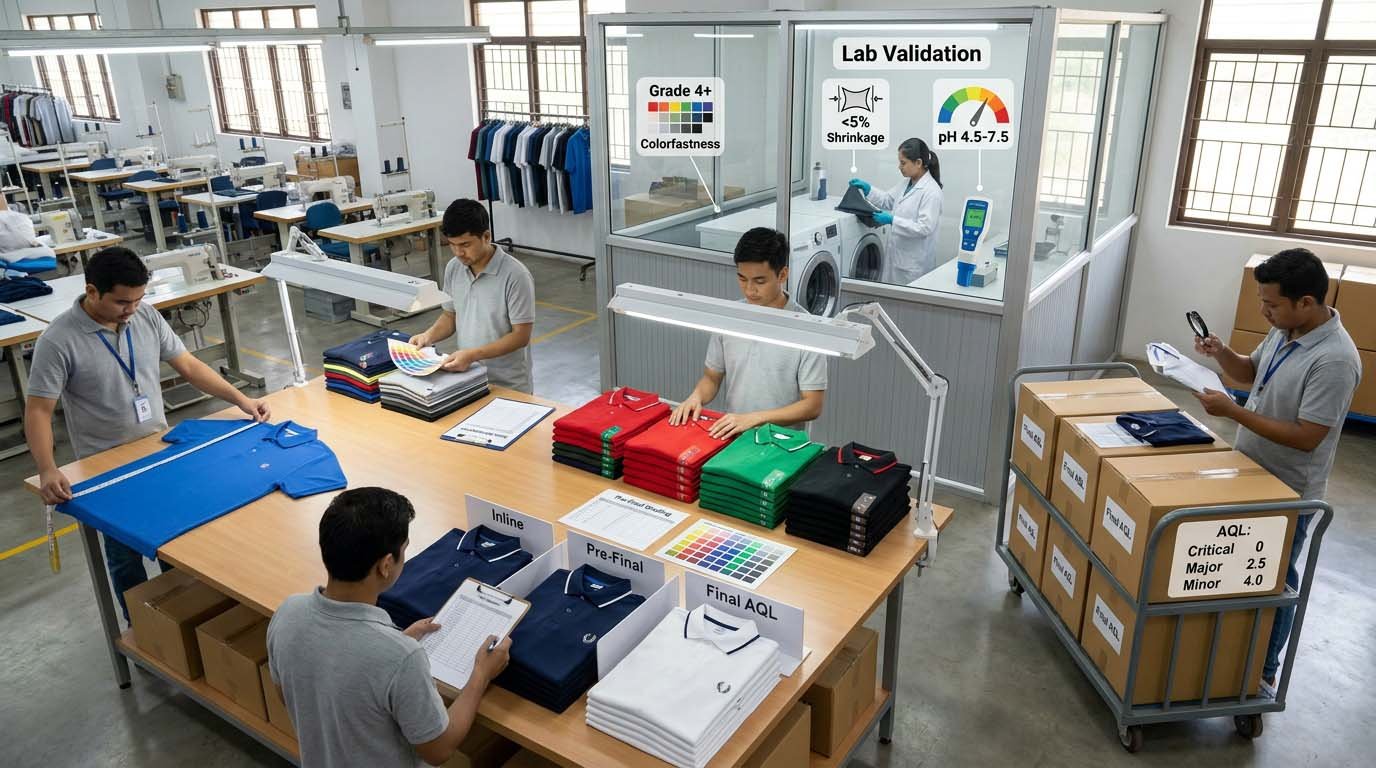
Inline Inspection at 30-50% Production
When to perform: 300-1,000 pieces produced (depending on order size)
Purpose: Catch systematic errors early
Sample size: 20-40 pieces from production lines
What to check:
Fabric consistency:
- Hand feel matches sample
- Color shade consistent across pieces
Measurements:
- 5-10 pieces measured (chest, length, sleeve)
- Check if within tolerance
Workmanship:
- Collar symmetry (left vs right)
- Seam quality (no skips, proper stitch density)
- Button attachment (pull test)
Logo/decoration:
- Embroidery density matches sample
- Print registration aligned
Inline inspection outcomes:
Pass: Continue production without changes
Minor issues found (<5% defect rate):
- Adjust process (e.g., collar tension)
- Continue production with monitoring
Major issues found (>8% defect rate):
- Halt production on affected line
- Rework already-produced defective pieces
- Fix root cause (machine adjustment, operator re-training)
- Resume production
Inline inspection cost: $120-200 (inspector time, documentation)
ROI example:
Order: 1,500 polos
Inline at 450 pieces: Found collar asymmetry on 10% (45 pieces)
Cost:
- Inspection: $150
- Rework: 45 × $3 = $135
- Total: $285
If skipped inline, found at final:
- 10% × 1,500 = 150 defective
- Rework: 150 × $10 = $1,500
- Savings: $1,500 - $285 = $1,215
I perform inline: On all orders >800 units or new suppliers. Inline catches 70% of systematic defects before they multiply.
Pre-final Inspection at 80-90% Completion
When to perform: Most garments finished, before packing
Purpose: Verify bulk consistency before final packing
Sample size: 60-80 pieces (larger than inline, smaller than final)
What to check:
Size grading consistency:
- Sample from all sizes (S, M, L, XL, XXL if applicable)
- Measure each size (verify L is actually larger than M, etc.)
Color consistency across production batches:
- Select pieces from early, middle, late production
- Compare shade under natural light
Defect distribution:
- Are defects random (isolated) or systematic (all from one line)?
- If systematic: Flag for 100% inspection of affected batch
Pre-final outcomes:
Random defects within AQL limits:
- Proceed to packing and final inspection
Systematic defects detected:
- Segregate affected batch
- 100% inspection and rework
- Delay packing until fixed
Pre-final cost: $150-250
I use pre-final: To verify size grading (common error—all sizes cut from same pattern marker) and detect late-production color shifts (dye lot changes).
Final AQL Inspection Before Shipment
When to perform: 100% production complete, all pieces packed
Purpose: Accept or reject decision before shipment
Sample size: Per ISO 2859-1 (typically 80-125 pieces for 1,000-3,000 unit orders)
Inspection Level: General Level II (standard)
AQL levels:
- Critical defects: AQL 0 (zero tolerance)
- Major defects: AQL 2.5 (standard for golf polos)
- Minor defects: AQL 4.0
What to check:
Full inspection per checklist:
- All measurement points
- All workmanship details
- All decoration quality
- Packing verification
Defect classification:
- Each defect categorized (Critical/Major/Minor)
- Counted separately by category
Comparison to acceptance limits:
Example: 1,000 pieces, sample 80
| Defect Type | AQL | Acceptance # | Rejection # | Found | Result |
|---|---|---|---|---|---|
| Critical | 0 | 0 | 1 | 0 | PASS |
| Major | 2.5 | 5 | 6 | 4 | PASS |
| Minor | 4.0 | 10 | 11 | 8 | PASS |
Overall: PASS (all categories within limits)
Final inspection outcomes:
Pass: Ship to buyer
Fail: 100% inspection + rework, re-submit for inspection
Final inspection cost:
Factory self-inspection: $150-250
Third-party inspection (SGS, Bureau Veritas): $300-500
I recommend: Third-party final inspection for first 3 orders with new supplier (avoid conflict of interest). After consistent quality, factory self-inspection acceptable with spot third-party audits (every 3rd order).
Essential Lab Testing Before Bulk Production
Why lab testing matters:
Quality issues inspection cannot catch:
- Shrinkage (only reveals after washing)
- Color bleeding (only reveals after washing)
- Chemical residues (requires pH testing)
- Fabric pilling (requires abrasion testing)
When to test: On sample fabric before bulk production approval
Core lab tests for golf polos:
1. Wash shrinkage test (AATCC 135):
Purpose: Verify fabric does not shrink excessively
Method:
- Measure fabric swatch before wash
- Wash per care label (1 cycle)
- Measure after wash, calculate shrinkage
Acceptable: <5% shrinkage (cotton/poly blend), <3% (synthetic)
Fail: >7% shrinkage (size will change significantly)
2. Color fastness to washing (ISO 105-C06):
Purpose: Verify dye does not bleed or fade
Method:
- Wash fabric with multi-fiber test strip
- Compare before/after using gray scale
Acceptable: Grade 4 or higher (minimal color change)
Fail: Grade 3 or lower (noticeable fading/bleeding)
3. pH test (AATCC 81):
Purpose: Ensure fabric not acidic/alkaline (skin irritation risk)
Method:
- Extract fabric solution in distilled water
- Measure pH with meter
Acceptable: pH 4.5-7.5 (neutral to slightly acidic)
Fail: pH <4.0 (too acidic) or >8.0 (too alkaline)
4. Pilling resistance (ASTM D3512):
Purpose: Verify fabric resists pilling during wear
Method:
- Abrade fabric with standardized equipment
- Rate pilling using visual scale
Acceptable: Grade 3-5 (minimal pilling)
Fail: Grade 1-2 (excessive pilling)
Lab testing cost:
Basic package (shrinkage + color fastness + pH): $150-250
Full package (add pilling + strength): $300-450
ROI:
Test cost: $200
Prevents: Return rate 10-15% due to shrinkage/bleeding (on $30,000 order = $3,000-4,500 in returns)
I require lab testing: On all new fabric suppliers before bulk production approval. One batch of failed shrinkage test (8% shrinkage) saved us $12,000 in potential returns—factory switched fabric mills before production.
FAQ: Inspecting Golf Polo Shirts
What is the minimum sample size for accurate quality inspection of golf polos?
For representative inspection: measure 10 pieces minimum, check workmanship on 20 pieces.
Why 10 pieces for measurement:
- Statistical minimum for detecting size variation
- Represents 1-2% of typical order (500-1,000 units)
- Captures variation across different production lines
Why 20 pieces for workmanship:
- AQL sampling for orders <1,000 units often requires 20-32 pieces
- Allows detection of 5-10% defect rates
- Spreads across multiple cartons (not just one carton)
Sample distribution:
For 1,000-piece order:
- Measurements: 10 pieces (from cartons 1, 10, 20, 30, 40—spread across shipment)
- Workmanship: 20 pieces (same cartons plus 5, 15, 25, 35, 45)
For 2,000-piece order:
- Measurements: 15 pieces
- Workmanship: 30 pieces (higher value at risk)
Do not:
- Check only 5 pieces (too small, not representative)
- Check only first carton (may not represent entire production)
I have seen buyers: Check only 3 pieces, find them perfect, approve shipment—then receive 8% defect rate in remaining unchecked pieces. 10-20 piece sample reveals true quality.
Can I approve bulk production based on a perfect pre-production sample?
No—samples often use premium materials and skilled operators not representative of bulk production.
Sample vs bulk production differences:
Sample stage:
- Master operators (15+ years experience) hand-make 2-5 pieces
- Premium fabric lot (factory selects best roll)
- Extra QC attention (every detail perfected)
Bulk production:
- Line operators (2-5 years average experience)
- Standard fabric lots (may vary from sample dye lot)
- Production speed priorities (40-50 pieces/hour per operator)
Real scenario:
Sample: Collar perfect (±1 mm symmetry), seams flawless
Bulk (1,200 pieces):
- Collar asymmetry: 12% of pieces (±5-8 mm)
- Seam puckering: 8% of pieces
Why: Sample made by master, bulk made by 10 operators with varying skill levels
What to do instead:
Inline inspection at 30% production:
- Verify bulk matches sample (fabric, workmanship)
- Catch systematic differences early
Measurement comparison:
- Sample measurements → Bulk measurements (should match within tolerance)
I advise: Never approve bulk based on sample alone. Require inline verification that bulk production replicates sample quality.
How do I check if my factory is using the same fabric as the approved sample?
Perform side-by-side hand feel comparison and request fabric mill lot numbers.
Hand feel test:
- Keep 1-2 sample pieces (do not give all samples to factory)
- At bulk inspection: Pull random bulk pieces
- Rub sample and bulk fabrics between fingers side-by-side
- Compare: Texture, softness, thickness
If different: Factory likely substituted fabric
Objective verification:
Request fabric information:
- Mill name
- Fabric composition (e.g., "95% cotton, 5% spandex")
- Fabric weight (GSM)
- Dye lot number
Compare:
- Sample fabric info → Bulk fabric info
- Should match exactly
If factory refuses to provide: Red flag—likely hiding fabric substitution
Fabric testing (if dispute):
Burn test:
- Cut small swatch from sample and bulk
- Burn with lighter (in safe environment)
- Observe: Cotton burns with steady flame and ash, polyester melts and smells like chemicals
- Different burning behavior = different fabric composition
Weight test:
- Weigh 10cm × 10cm swatch from sample and bulk
- Should be within ±5 grams
I have caught factories: Using 190 GSM bulk fabric when sample was 200 GSM (10 GSM lighter—feels thinner, cheaper). Buyer did not notice until customer complaints. Always verify fabric matches.
What measurements need left-right comparison to catch asymmetry defects?
Collar, sleeves, and placket require left-right measurement—chest and length do not.
Critical left-right comparisons:
Collar (most important):
- Left collar point to center back: Measure
- Right collar point to center back: Measure
- Compare: Difference should be ≤3 mm
- Why: Collar asymmetry is #1 visible defect customers notice
Sleeves:
- Left sleeve length: Shoulder seam to cuff
- Right sleeve length: Shoulder seam to cuff
- Compare: Difference should be ≤5 mm
- Why: One short sleeve looks like manufacturing error
Placket (if asymmetric design):
- Some polos have asymmetric placket (buttons offset)
- If symmetric design: Check button spacing is equal top to bottom
Measurements that do not need left-right:
Chest width:
- Measured across front (single measurement)
- Cannot be "asymmetric" (unless panels different colors/fabrics)
Body length:
- Measured at center back (single measurement)
How to measure efficiently:
Check collar on: ALL pieces you inspect (if measuring 10 pieces, check 10 collars)
Check sleeves on: 5-10 pieces (less critical than collar)
I measure collars: On every piece during final inspection sample. Takes 30 seconds per piece but catches most common defect.
Should I perform wash testing on polos before approving the entire shipment?
Yes—wash 5 sample pieces to reveal shrinkage, color bleeding, and print durability issues invisible in dry inspection.
Why wash testing is critical:
Defects only visible after washing:
- Shrinkage (polo becomes too small)
- Color bleeding (dye transfers to other garments)
- Print cracking (ink breaks along flex lines)
- Seam puckering (fabric shrinks faster than thread)
Dry inspection cannot detect these—fabric looks perfect until washed.
How to wash test:
Step 1: Take 5 pieces from bulk
- Random selection from different cartons
- Label pieces (Test 1-5) for tracking
Step 2: Measure before wash
- Chest, length, sleeve
- Record measurements
Step 3: Wash per care label
- Use recommended temperature (usually cold or warm)
- Mild detergent
- Include white test cloth (check color bleeding)
Step 4: Tumble dry or air dry (per care label)
Step 5: Measure after wash
- Compare to pre-wash measurements
- Calculate shrinkage: (Before - After) / Before × 100%
Step 6: Inspect for defects
- Print cracking: Look for lines in printed/embroidered areas
- Color bleeding: Check if white test cloth is stained
- Seam puckering: Look for new rippling along seams
Acceptable results:
- Shrinkage <5%
- No color bleeding
- No print cracking
- No new seam puckering
Fail indicators:
- Shrinkage >7% (size change too large)
- Color bleeding (dye transfers to white cloth)
- Cracks in print/embroidery
Wash test cost: $50-80 (washing service + time)
Prevents: 10-20% return rate due to wash-related issues (on $30,000 order = $3,000-6,000 saved)
I perform wash tests: On every new fabric supplier and every new color (even from trusted supplier—dye lot variation can cause bleeding).
Conclusion
Inspecting golf polo quality requires shifting focus from sample approval to bulk production consistency verification through three critical checkpoints—fabric side-by-side comparison detects yarn quality or finish treatment substitution between sample and bulk, construction symmetry measurement catches collar, sleeve, and placket asymmetry exceeding ±3mm tolerance that visual inspection misses, and multi-stage sampling with inline inspection at 30% production catches systematic defects when rework costs $2-3 per piece versus $8-12 at final stage—combined with mandatory wash testing of 5 bulk pieces revealing shrinkage, color bleeding, and print durability issues invisible in dry fabric evaluation. Measure 10 pieces minimum for size verification, inspect workmanship on 20 pieces spread across multiple cartons, perform seam stress pulls at underarm and side seams, and verify logo decoration through side-by-side sample comparison before approving shipment, accepting that perfect samples do not guarantee acceptable bulk production without inline consistency verification that reveals systematic quality gaps early when corrections remain economically feasible.