You have a vision for a killer golf apparel brand, but the path from idea to a product in your customer's hands feels like a 1,000-piece puzzle. Miss one step, and your launch could unravel.
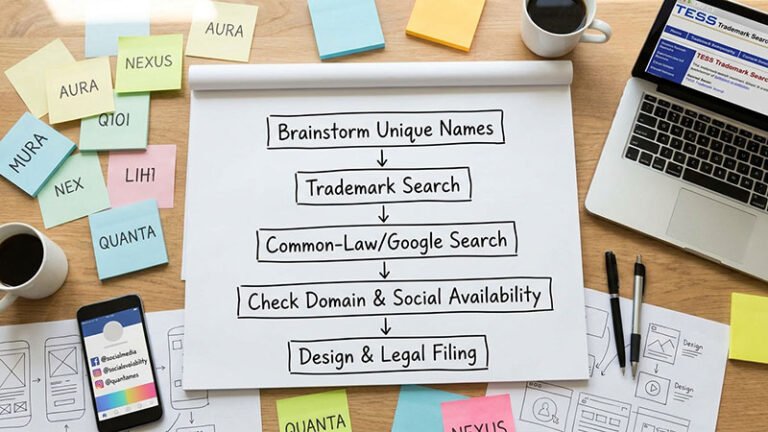
Launching a private label golf brand is a systematic process. It starts with defining your brand and fit, then moves to material selection, tech pack creation, sampling, quality control, and production planning. This guide is your step-by-step calendar.
I've worked with countless founders like Bobby who are passionate about golf but new to apparel production. The ones who succeed are those who master the process and avoid the common traps. They understand that a great brand isn't just about a cool logo; it's about getting the fit, fabric, and quality right from day one. This guide is the playbook I share with them, with no steps skipped.
How Do you Define Your Brand and Assortment Strategy?
A vague idea like "I want to make a better golf polo" isn't a strategy. It's a recipe for creating products that get lost in a crowded market. A strong foundation requires clear choices about who you are serving, what you are selling, and why you are different. This initial planning prevents costly changes down the line.
Pinpoint your target golfer segment and price point. Map out a balanced product assortment. Then, analyze competitors to find a unique, defensible selling proposition for your brand.
Target golfer segments and price tiers
First, we must define exactly who we are selling to. Is it the avid, performance-focused player who needs technical gear for 100+ rounds a year, or the casual weekend golfer who values style and comfort? This choice dictates everything. We also map out the channel (Direct-to-Consumer, pro shops, online marketplaces) and set realistic MSRP bands for each category. This strategy must also consider the climate your golfer plays in—a collection for Texas needs to prioritize sun protection and breathability, while a UK-focused brand needs wind and rain solutions.
Assortment map: polos, mid-layers, outerwear, bottoms, accessories
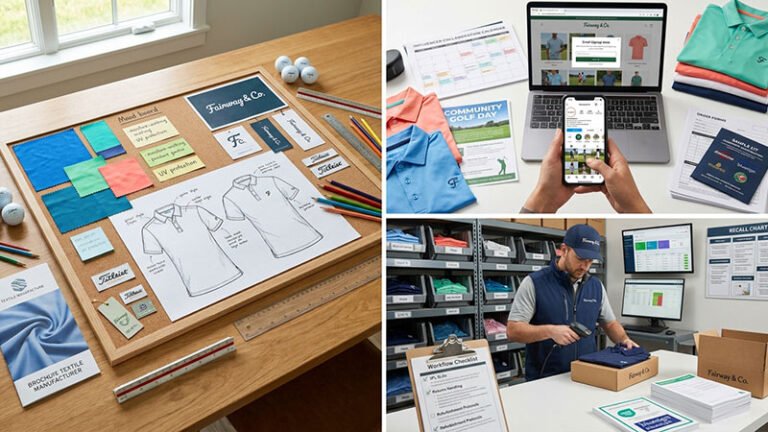
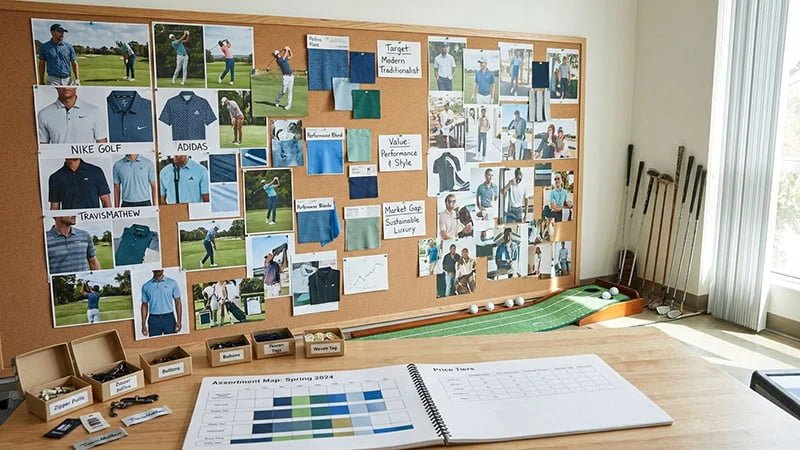
With the target customer defined, we build the product matrix. A common mistake is trying to launch too many styles at once. A smarter approach is a focused assortment: maybe 3-4 hero polos, a key mid-layer, and one performance bottom. We structure this by season and price to ensure the collection feels cohesive. We also define the silhouettes (classic, athletic, relaxed fit) and pay special attention to creating specific fits for women, which are often an afterthought. This planning stage concludes with a volume forecast to help us understand our purchasing power.
Competitor benchmarks and differentiation
You cannot be different if you don't know what "same" looks like. I have clients buy three direct competitor polos. We don't just look at them; we deconstruct them. We benchmark their UPF rating, feel their fabric's wicking ability, and stretch them to test recovery. From this analysis, we identify 2–3 unique value propositions. Is it a proprietary fabric finish? A better collar that never curls? A more athletic fit? These become your testable claims and proof points, which we will later validate with lab reports and wear-testing to build real brand trust.
How Do You Build Fit Blocks and Size Standards?
Your brand's fit is its silent signature. Inconsistent fit is the number one killer of e-commerce apparel brands, driving up returns and destroying customer loyalty. "Medium" must mean the same thing every single time.
Establish a base size with clear measurement tolerances. Create logical grading rules for your entire size range. Finally, validate every fit with a structured wear-test plan before a single yard of bulk fabric is cut.
Base size, fit models, and tolerance tables
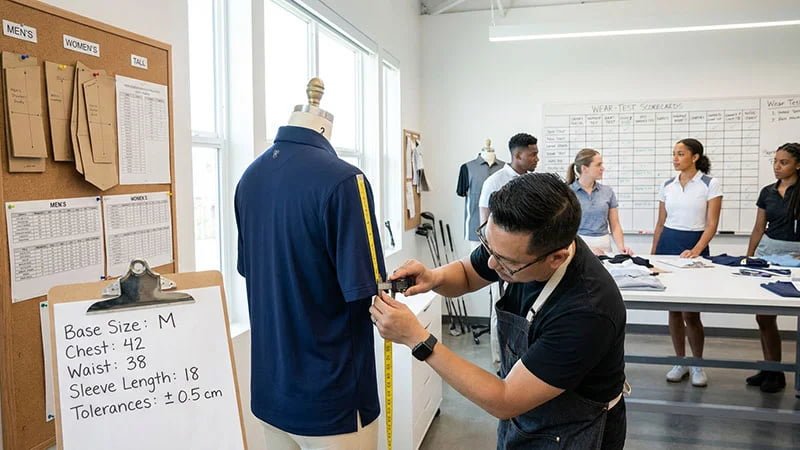
Everything starts with a single point of reference. We select a base size (usually Men's Medium or Women's Small) and find a professional fit model whose body measurements perfectly match our target customer profile. We then create a library of POMs (Points of Measurement) for that base size, defining the exact spec for chest, waist, length, etc. Crucially, we also set tolerances (e.g., chest width ±1.0 cm). This tells the factory exactly what is acceptable in production.
Grading rules for men/women/tall
Once the base size is perfect, we create the grading rules—the mathematical formula used to scale the pattern to all other sizes. A beginner's mistake is to grade linearly, which can make an XXL look like a disproportionate tent. A professional approach involves non-linear grading, carefully adjusting the sleeve length, torso width, and crotch rise to maintain proportionality and ensure a great fit from XS to 2XL, with separate rules for women's and tall sizes.
Wear-test plan and feedback loop
A garment can fit perfectly on a static mannequin but fail completely during a golf swing. This is why a wear-test plan is non-negotiable. We give the final fit samples to a group of 10–20 target golfers. They play a full round and complete a detailed scorecard, rating mobility during the swing, whether the fabric clings when they sweat, snag resistance, and overall comfort. This feedback is gold. We use it to make final revisions to the fit block, ensuring the product performs in the real world.
How Do You Select Golf-Ready Fabrics and Trims?
A swatch card can be deceiving. A fabric that feels great in your hand might feel like a plastic bag after nine holes in the sun. Performance claims without data are just marketing buzzwords.
Prioritize core performance features like UPF, wicking, and stretch with specific, testable standards. Evaluate DWR options, including PFAS-free chemistry. Scrutinize every trim, from the thread to the zipper, for comfort and durability.

Performance priorities: UPF, wicking, stretch/recovery
Your fabric is your promise to the customer. We verify these promises with data, using internationally recognized test standards. We don't say "good stretch"; we say "ASTM D2594 with ≥90% recovery."
| Performance Metric | Test Standard | Target Result |
|---|---|---|
| UPF | AATCC 183 | 40+ or higher |
| Moisture Wicking | AATCC 195 | Rating ≥3.5 |
| Stretch & Recovery | ASTM D2594 | Recovery ≥90% |
| Shrinkage (Dimensional Stability) | AATCC 135 (3 washes) | ≤5% |
DWR options incl. PFAS-free and spray ratings
For outerwear, water resistance is key. With new regulations banning traditional "forever chemicals," we must specify a PFAS-free DWR (Durable Water Repellent) finish. The standard is an AATCC 22 spray rating of ≥90 when new and ≥80 after 5 washes. For true waterproof rain gear, we also specify a hydrostatic head pressure of at least 5,000mm (AATCC 127) and ensure the seam sealing tape is compatible and durable.
Trims and comfort: soft hand threads, zippers, knit collars
A premium garment can be ruined by cheap trims. We give every component attention. The thread in the neck seam must have a soft hand to prevent chafing. We specify high-quality zippers from brands like YKK and test them for corrosion resistance to sweat. Knit collars and cuffs are engineered to be stable and resist curling or torquing after washing, and we test their colorfastness to perspiration to prevent color bleeding.
How Do You Define Branding and Aesthetics?
Your logo and colors are what customers see first. If they peel, crack, or fade, your brand's reputation for quality is immediately damaged. Consistency is the hallmark of a professional brand.
Choose your branding application method—embroidery, heat transfer, or silicone—and test its durability rigorously. Lock in your color standards using Pantone TCX numbers. Ensure all branding elements are applied consistently across every garment.
Logos/embellishments: embroidery, heat transfer, silicone/TPU
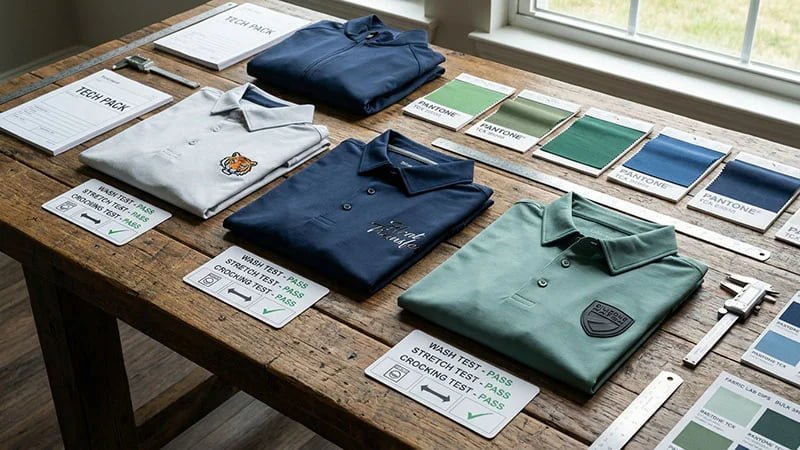
The type of logo application affects both the look and durability. A heat transfer must survive at least 5 home laundry cycles and stretching without cracking or peeling. We test for this. A silicone badge must be lightweight enough not to affect the drape of the fabric. We also test for crocking (color rubbing off), targeting a dry rating of ≥4 and a wet rating of ≥3.5 on the AATCC 8 scale.
Color standards: Pantone TCX, lab dips, bulk shade bands
To prevent color drift between your sample and bulk production, we enforce strict color standards. We use the Pantone TCX (cotton) system as our universal language. We then approve physical lab dips from the factory under controlled D65/UV lighting. Once the color is perfect, that lab dip becomes the standard. For bulk production, we establish shade bands—a small range of acceptable variation—to ensure the "Navy Blue" in your first drop matches the one you order six months later.
Graphic/print placement and line consistency
Consistency is key. We define the exact placement for every logo and graphic in the tech pack with a tight tolerance, usually ±5 mm. This ensures the logo is in the exact same spot on every single shirt. We also ensure that key brand motifs or design elements are carried consistently across different styles in the collection, creating a cohesive brand identity on the rail.
How Do You Create Complete Tech Packs?
A tech pack is the blueprint and legal contract for your product. A vague or incomplete tech pack is an invitation for factory errors, delays, and disputes. It is your single source of truth.
Your tech pack must include detailed sketches, a complete Bill of Materials (BOM), specific construction notes, and precise measurement specs for every size. It should leave nothing to interpretation.
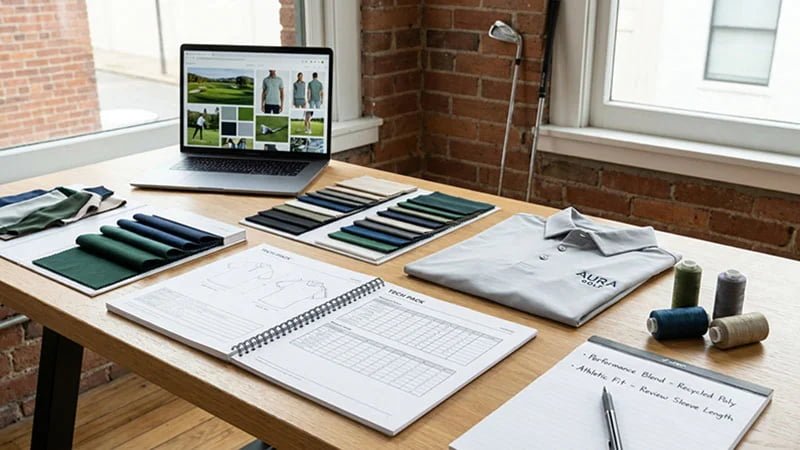
Sketches, BOM, construction notes, stitch types
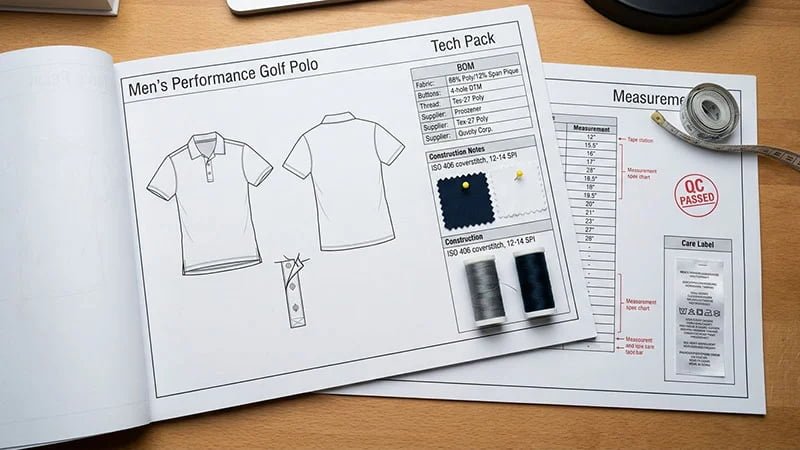
This is the core of the tech pack. It includes flat technical sketches from all angles, and a full Bill of Materials (BOM) listing every fabric, trim, thread, and label with their approved supplier and item number. The construction notes are critical, specifying stitch types (e.g., 4-needle flatlock), stitches per inch (SPI), and any special machine requirements, leaving no room for factory assumptions.
Measurement specs and callouts by size
This section contains the POM (Points of Measurement) chart. It lists all the measurement points for your base size, the grading rules to scale up and down, and the acceptable tolerances for each point in production. This chart is what the factory's Quality Control team will use to inspect the finished garments.
Care/label compliance (fiber, country of origin)
Getting labels wrong can result in your shipment being seized by customs. This section details the exact requirements for all labels: the correct fiber content percentages (e.g., 88% Polyester / 12% Spandex), Country of Origin (COO), brand/RN numbers, and legally compliant care instructions using ISO symbols for all target markets (USA, EU, UK, Canada).
How Do You Plan the Sampling Workflow?
Sampling is not about getting one good-looking polo. It's a multi-stage process designed to validate fit, fabric, and construction before you commit to the expense of bulk production. Rushing this stage is a classic and costly mistake.
Follow a structured Proto → Fit → SMS → PP → Size Set workflow, with clear approval criteria at each stage. Use 3D sampling to speed up early-stage fit reviews, but always confirm with a physical sample.

Proto → Fit → SMS → PP → Size set stage gates
Each sample has a specific job. We manage this with clear stage gates. A sample must pass one stage before moving to the next.
| Sample Stage | Purpose | Approval Criteria |
|---|---|---|
| Proto Sample | Checks the basic pattern and concept. | Matches the design intent of the tech pack. |
| Fit Sample | Perfects the fit on a live model. | Passes wear-test for comfort and mobility. |
| SMS (Salesman) | For marketing photos and sales. | Made in correct bulk fabric, color, and branding. |
| PP (Pre-Production) | The final "golden sample." | 100% correct. This is the standard for bulk. |
| Size Set | Validates the grading for all sizes. | Ensures small and large sizes fit correctly. |
3D sampling and remote fit reviews
3D sampling is a powerful tool to accelerate the early stages. We can check fit on a 3D avatar and make quick revisions to the pattern without waiting for a physical sample to be shipped. However, for performance fabrics, a 3D avatar cannot replicate the real-world stretch, drape, and handfeel. This brings me to a critical insight: you should never approve the final fit without a physical confirmation.
Sample lead times and approval criteria
We set realistic sample lead times for each stage (e.g., proto 7-10 days, SMS 10-14 days). A factory that promises a 3-day turnaround is likely cutting corners. The most important approval is the PP sample. This is where we lock in the final spec. As I always tell clients, any change after the PP sample is signed off—even a "small" one—is not a suggestion; it's an Engineering Change Order that will cause delays and add costs.
How Do You Handle Costing, MOQ, and Supplier Negotiation?
Price-only buyers get what they pay for: risk. Understanding your cost structure and negotiating from a place of knowledge is crucial for building a profitable, sustainable partnership.
Get a transparent cost breakdown (BOM vs. CM). Understand the factory's MOQ structure and how it impacts your per-unit cost. Lock in commercial terms like payment, price validity, and duties upfront.
Target FOB, BOM vs CM, yield/wastage
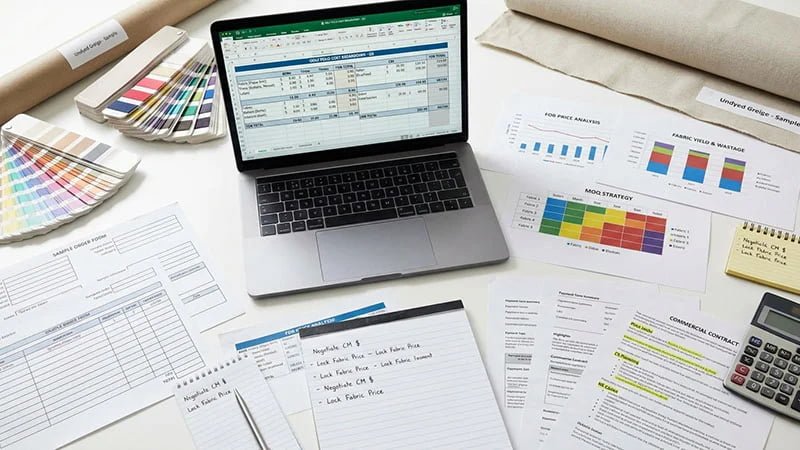
A single FOB (Free on Board) price hides information. I always insist on a cost breakdown that separates the BOM (Bill of Materials) from the CM (Cut & Make). This shows you the cost of the fabric and trims versus the cost of labor. It allows you to make smarter decisions—for example, seeing if a slightly cheaper fabric has a significant impact. We also verify the yield (how much fabric is used per garment) and wastage factors.
MOQ by fabric/color/size and dye lot strategy
New brand owners often struggle with the Minimum Order Quantity (MOQ). Here’s the truth: if your first order can't hit at least 80% of the factory's MOQ, you risk being de-prioritized or paying heavy surcharges. A better strategy is to understand the MOQ at each level—fabric, color, and style—and work with the factory on smart solutions, like booking a larger quantity of undyed 'greige' fabric that can be dyed into multiple colorways in smaller batches.
Payment terms, price locks, FX/duty planning
Commercial terms are just as important as the price itself. We negotiate payment terms (a typical start is 30% deposit, 70% before shipping), establish price locks for a season to protect against raw material increases, and create a plan for handling foreign exchange (FX) fluctuations. We also identify the correct HS codes for customs to accurately predict duty rates, avoiding surprise costs when the goods land.
How Do You Build a Quality and Compliance Framework?
You approved a perfect sample, but the bulk order has loose stitching, color variations, and feels cheaper. This is sample-to-bulk quality drift, and it happens when quality standards are not explicitly defined and enforced.
Establish clear AQL levels for inspections. Define a comprehensive performance testing plan. Ensure your products are compliant with all chemical regulations in your target markets.
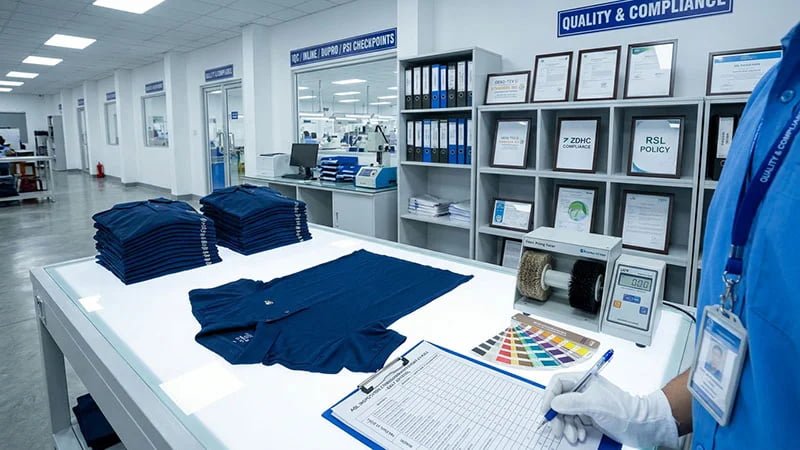
AQL levels and IQC/inline/FQC checkpoints
We replace subjective opinion with objective data. We use a statistical standard like ANSI/ASQ Z1.4 to set AQL (Acceptable Quality Limit) levels for inspections. A common standard is Critical 0 (for safety issues), Major 2.5 (for functional defects), and Minor 4.0 (for small aesthetic issues). These levels are checked at key stages: IQC (Incoming Quality Control) for fabrics, DUPRO (During Production Inspection), and PSI (Pre-Shipment Inspection).
Performance testing: UPF, wicking, colorfastness, snag/pilling
This is where we solve sample-to-bulk quality drift. We don't just hope the bulk fabric is the same as the sample; we test it. Our quality framework includes re-testing a sample from the bulk fabric lot for all key performance claims. We're checking that the UPF is still 40+, the colorfastness to light is still a Grade 4, and the pilling resistance meets the standard. This holds the factory accountable to the quality you approved.
Chemical/RSL and ZDHC alignment
Product safety and environmental compliance are non-negotiable. We adopt a brand RSL (Restricted Substances List) and ensure the factory aligns with the ZDHC (Zero Discharge of Hazardous Chemicals) MRSL. We often specify fabrics that are certified to OEKO-TEX Standard 100. This ensures the product is free from harmful substances and can be legally sold in regions with strict chemical laws like the EU (REACH) and California (Proposition 65).
How Do you Plan for Production and Industrialization?
The best tech pack is useless without flawless execution on the factory floor. This phase is about translating your blueprint into thousands of perfectly made garments, on time.
Map your critical path from fabric booking to packing. Work with the factory to set up the production line for efficiency. Implement strict change control and risk gates like a pilot run review.
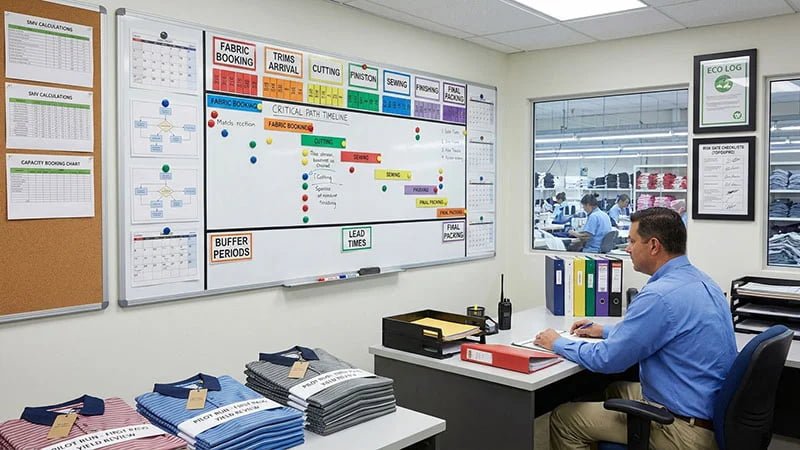
Critical path: fabric booking, trims, cutting-to-pack
We use a TNA (Time and Needle Analysis) or critical path calendar to track every single milestone. This is a detailed project plan. Fabric booking is almost always the longest lead time, so we start there. We build in buffers for potential delays in dyeing or shipping. The TNA also accounts for fabric relaxation time before cutting, which is vital for preventing shrinkage issues.
Line setup, SMV, and capacity booking
Before mass production, the factory does a line setup based on the garment's SMV (Standard Minute Value). This ensures the workflow is balanced and efficient. We always insist on a pilot run of 50–100 pieces. This small batch is intensely reviewed to catch any process issues before they are replicated thousands of times. Our goal is a First Pass Yield (FPY) of over 98%.
ECO/change control and risk gates (TOP, DUPRO)
Once production starts, changes must be managed carefully. We use a formal ECO (Engineering Change Order) log. Any critical change requires re-confirming with a new sample. We use risk gates to monitor quality throughout the process: a TOP (Top of Production) review of the first pieces off the line, and DUPRO (During Production) inspections at 30% and 60% completion.
How Do You Manage Packaging, Labeling, and Sustainability?
Your product isn't ready until it's packed, labeled correctly for every market, and all sustainability claims are backed by proof. Errors here can lead to customs holds, retailer chargebacks, or legal trouble.
Design retail-ready packaging that is compliant and protective. Ensure all fiber and care labels meet the legal requirements of your sales regions. Verify any sustainability claims with official certificates.
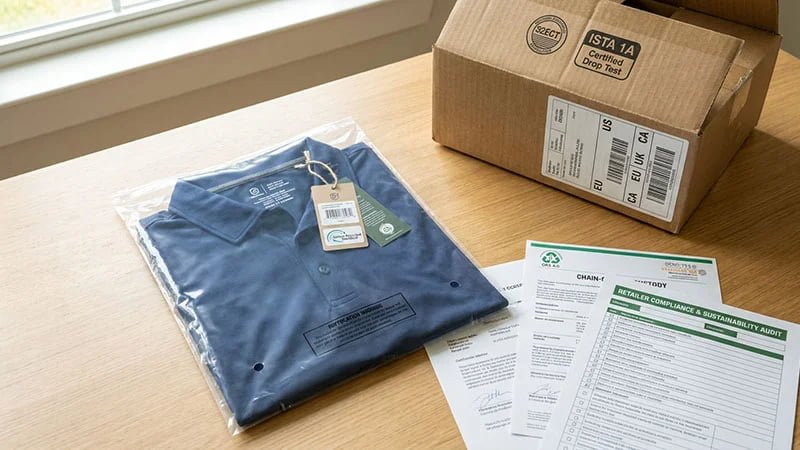
Retail-ready packaging, polybag specs, warnings
The final presentation matters. We specify every detail of the retail-ready packaging, from the polybag thickness and ventilation holes to the legally required suffocation warnings. We define the carton strength (e.g., 32ECT) and run drop tests (like ISTA 1A) for products shipping directly to consumers to ensure they arrive in perfect condition.
Fiber/label compliance for US/EU/UK/CA
This is pure compliance. We ensure every label meets the strict legal requirements of all target markets. This includes the exact fiber percentages, the Country of Origin (COO), brand RN/CA numbers, and bilingual care instructions where needed. Getting this wrong is an expensive, avoidable mistake.
Recycled content and sustainability claims
If you're making a sustainability claim, you must be able to prove it. Saying a shirt is "made from recycled bottles" requires documentation. We verify the GRS (Global Recycled Standard) certificates for the yarn and fabric and maintain the chain-of-custody records. This protects the brand from accusations of "greenwashing" and builds authentic trust with consumers.
How Do You Handle Logistics and Launch Readiness?
Getting the product made is only half the battle. You need to get it to your warehouse efficiently and have all your marketing assets ready to go live the moment it arrives.
Finalize your shipping terms, freight mode, and import documents. Set up your barcodes and carton labels for smooth warehouse receiving. Prepare your product description page (PDP) assets in parallel with production.
Incoterms, freight mode, and import docs
A smooth delivery requires careful coordination. We select the right Incoterms (like FOB or DDP) to define who pays for and bears risk during shipping. We choose the freight mode (air vs. sea) to balance speed and budget. We ensure all import documents—like the Commercial Invoice, Packing List, and Certificate of Origin—are 100% accurate to avoid customs delays.
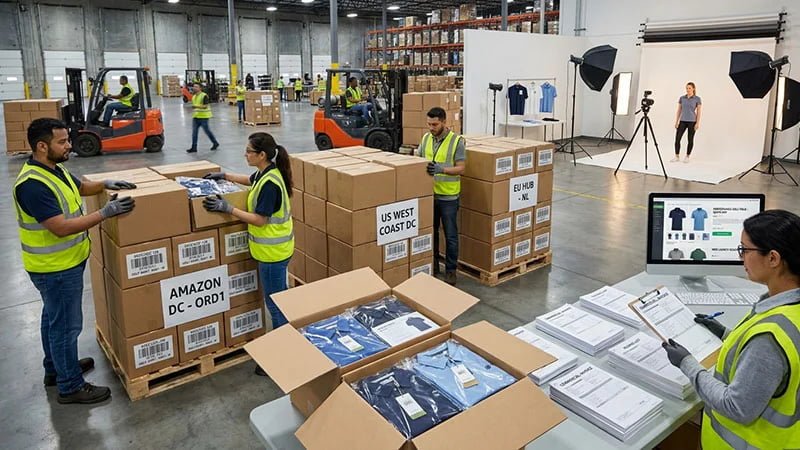
Barcode/GTIN, carton labels, DC routing
For modern retail, data is everything. We generate official GS1 GTINs (barcodes) for each SKU. We work with the factory to produce compliant carton labels (like the SSCC or UCC-128) so the warehouse can receive the inventory quickly and accurately. This step is crucial for anyone selling to larger retailers.
PDP assets: photography, copy, care, fit notes
While the goods are on the water, the marketing team should be finalizing the Product Description Page (PDP) assets. This includes high-quality studio and lifestyle photography, feature-and-benefit-driven copy, and detailed care and fit notes. All performance claims made in the copy must be backed by the test reports we gathered earlier. When the inventory lands, you should be ready to flip the switch and go live.
What Does a 24-Week Private Label Calendar Look Like?
This process can seem long, but good planning makes it manageable. A typical timeline for a new collection from concept to launch is about six months, or 24 weeks.
The calendar is broken into phases: design and development (Weeks 1-10), pre-production (Weeks 11-16), and production and shipping (Weeks 17-24). Each phase has clear milestones and deliverables.
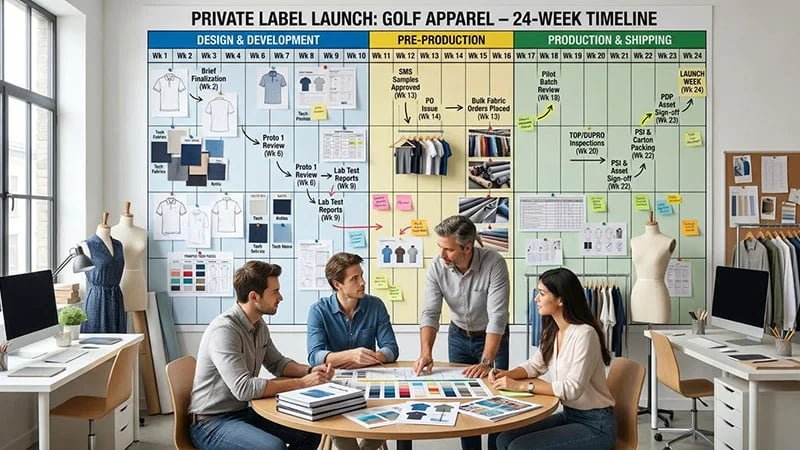
Weeks 1–4: Brief, tech packs, fabric shortlist
This is the foundation. You finalize the brand brief, create version 1 of your tech packs, and work with your manufacturing partner to shortlist and test initial fabrics and trims.
Weeks 5–10: Proto/Fit, test, cost/MOQ lock
This is the core development phase. You'll go through proto and fit sample rounds, conduct the first round of lab tests, negotiate and lock in your FOB price and MOQ, and prepare your purchase orders.
Weeks 11–16: SMS, PO, fabric bulk, PP
Here, we move toward production. You'll receive Salesman Samples (SMS) for marketing, issue the official POs, the factory will order the bulk fabric, and you will approve the final "golden" PP sample.
Weeks 17–22: Production, TOP/DUPRO, lab tests
The factory floor is now active. The factory runs a pilot batch, then moves to mass production. We conduct TOP and DUPRO inspections on the line and re-test samples from the bulk fabric lot to ensure consistency.
Weeks 23–24: PSI, ship, launch content final
The final stretch. The finished goods pass a Pre-Shipment Inspection (PSI). You book the freight. Your team gives the final sign-off on all PDP assets. The product ships, and you're ready to go live.
What Is on the Final Risk Mitigation Checklist?
Even with the best plan, things can go wrong. A professional partner anticipates these risks and has contingency plans in place before they become crises.
The biggest risks are color and shrinkage variation, poor branding durability, and supply chain disruptions. Mitigate these with shade bands, wash tests, and backup supplier plans.
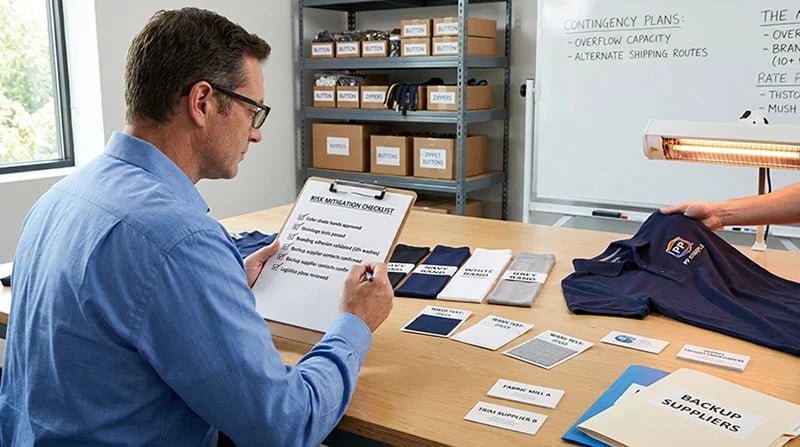
Color/lot control, shrinkage, shade continuity
To prevent the color of a polo ordered in June from being different than one ordered in December, we establish and store physical shade bands for every color. We also re-test the shrinkage of every new bulk fabric lot to ensure it's within our tolerance.
Branding adhesion/handfeel validation
We put the final approved PP sample through an internal "torture test"—10 to 15 home wash cycles followed by stretch tests. We are looking for any cracking, peeling, or loss of adhesion on heat transfers. This simple test prevents widespread customer complaints later.
Backup materials, capacity, and logistics plans
A professional supply chain has redundancy. We identify and pre-approve backup fabric mills and trim suppliers. We have conversations about overflow capacity options in case of a sudden surge in demand. And we have relationships with at least two different freight forwarders in case one has issues with a shipping lane.
Frequently Asked Questions?
What if I'm not a designer and can't create a detailed tech pack?
This is a very common and valid question. Most successful brand founders are visionaries, not technical designers. The key is to partner correctly. You can hire a freelance apparel technical designer to translate your vision into a professional tech pack. Alternatively, a good manufacturing partner like us has an in-house team that can help build the tech pack from your sketches, reference garments, and clear instructions. Don't let this step intimidate you; a good partner will bridge this gap for you.
I can't meet the Minimum Order Quantity (MOQ). What should I do?
This is the most common hurdle for new brands. Be honest and upfront with your potential manufacturing partner. Often, the MOQ is driven by the fabric mill, not the sewing factory. Here are a few strategies: 1) Launch with fewer SKUs or colorways to concentrate your order volume. 2) Ask if the factory has high-quality stock fabrics available, which often have lower minimums. 3) If the gap is still too large, it is better to find a smaller workshop that specializes in new brands, even if the per-unit cost is higher. Ordering more than you can sell is the quickest way to kill your cash flow.
How much does it actually cost to launch a small collection?
There is no single answer, but I can break it down. You should budget for three main buckets: 1) Development Costs: This includes tech pack creation, multiple rounds of sampling, and shipping, which can be several hundred to a few thousand dollars before you even place an order. 2) Production Costs: This is your final cost-per-garment multiplied by the MOQ. This will be your largest single expense. 3) Landed Costs: This includes shipping from the factory, plus import duties and tariffs, which can add another 15-30% on top of your production cost. A common mistake is to only budget for production and forget about development and landed costs.
Can I launch a brand faster than the 24-week calendar you outlined?
Yes, but it is extremely risky and I do not recommend it for a new brand. The 24-week timeline has buffers built in for realistic delays: lab dips that need correction, fit samples that require a second version, or holidays that close the factory. To shorten the timeline, you have to cut corners—usually by skipping wear-testing, rushing approvals, or paying for expensive air freight. This often leads to quality mistakes in bulk production that end up costing far more time and money to fix than if you had followed a proper timeline from the start.
What is the single biggest mistake you see new golf apparel brands make?
The biggest mistake is chasing the lowest FOB price instead of investing in the best process and partner. New founders get quotes from several factories and automatically pick the cheapest one. They don't realize that the "cheaper" price often comes with hidden costs: poor communication, missed deadlines, inconsistent quality, and zero accountability. The total cost of a delayed launch, returned products, and a damaged brand reputation is always higher than paying a fair price to a reliable partner who delivers on their promises.
Conclusion
Building a private label golf brand is a marathon, not a sprint. This guide provides the framework to manage the details, mitigate the risks, and turn your vision into a successful, profitable brand.