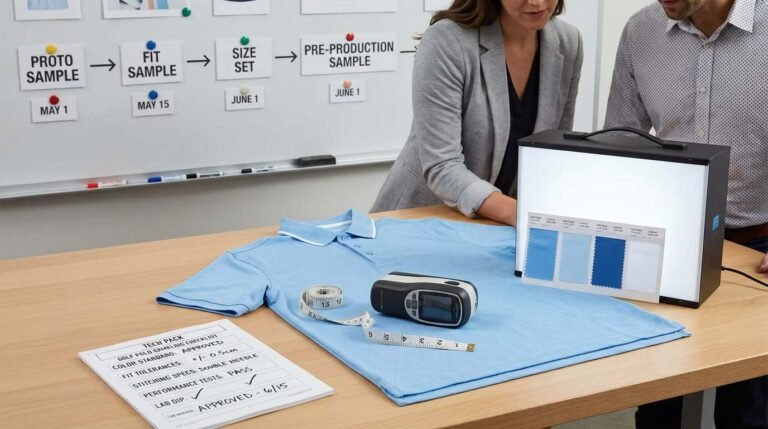
Quality polo shirt production requires 4 weeks because each week addresses specific defect categories—fabric consistency, construction accuracy, decoration quality, and final compliance—with scheduled checkpoints that catch problems before they become unsellable inventory.

I am Will from FUWAY. I handle lead time negotiations with 40-60 e-commerce buyers monthly. Every week, buyers ask if we can compress our 4-week standard lead time. They see competitors advertising 7-10 day turnaround and wonder why we need longer. Some assume we are inefficient. Others think we are padding the schedule. The reality is different. Our 4-week timeline exists because we learned what breaks when you accelerate production without adequate testing windows. This guide explains what actually happens during those 4 weeks and what you lose when suppliers promise faster delivery.
Quick Answers: Polo Shirt Production Lead Time
What does lead time actually measure in apparel manufacturing?
Lead time measures days from purchase order confirmation (with approved samples and specifications) to ex-factory date when finished goods are ready for shipment. It does not include sampling time before PO, freight transit time, or customs clearance. Standard quality polo production is 25-30 working days (4 weeks) from PO to ex-factory.
Why do quality polo shirts take 4 weeks instead of 1-2 weeks?
Week 1: Fabric procurement, lab dip approval, pre-shrinking, and inspection. Week 2: Pattern grading, fabric cutting, fusing preparation, and embroidery setup. Week 3: Sewing, assembly, decoration application, and in-line quality checks. Week 4: Finishing, washing, pressing, packaging, final AQL inspection, and documentation. Each week has mandatory waiting periods for testing and approvals that cannot be compressed without quality risk.
What quality problems happen when you rush production to 10-14 days?
Color variation between batches (no time for lab dip approval), size inconsistency (skipped pre-production measurement verification), decoration defects (rushed embroidery setup without test runs), shrinkage surprises (no time for fabric pre-shrinking or wash testing), and failed final inspection (compressed QC with higher defect pass-through rates of 8-15% versus normal 2-4%).
Can you pay premium to speed up production without quality loss?
Slight acceleration possible: 4 weeks to 3.5 weeks with 10-15% premium for priority scheduling. This maintains all quality gates but eliminates idle time between stages. Compression below 3 weeks eliminates critical testing windows and increases defect risk exponentially. No premium amount makes physics-based processes (fabric dyeing, shrinkage stabilization) happen faster.
What is the difference between lead time and sampling time?
Sampling time (2-4 weeks) happens before purchase order—includes pattern development, proto samples, revisions, and pre-production sample approval. Lead time (4 weeks) starts after you approve pre-production samples and issue PO. Total timeline from initial design to receiving goods is 6-8 weeks for quality production.
Do smaller order quantities reduce lead time?
No. Lead time is process-driven, not volume-driven. 300 pieces and 3,000 pieces follow same quality checkpoints and fabric/trim procurement timelines. Small orders may actually extend lead time because they wait for fabric availability or batch consolidation, while large orders justify dedicated production runs.
When should I place my order to meet my inventory deadline?
Work backward from when you need inventory in your warehouse: Add 3 weeks for international shipping, 4 weeks for production lead time, 2-3 weeks for sampling. Total: 9-10 weeks before you need sellable inventory. Add buffer time for unexpected delays. Orders placed 12 weeks before inventory deadline are comfortable. Orders placed 6 weeks before deadline force compromises.
What Does Lead Time Actually Cover and What Misunderstandings Create Disputes?
Lead time confusion creates 60% of timeline disputes I handle. Buyers misunderstand what the clock starts from, what events consume time without visible progress, and what acceleration actually means versus what suppliers promise.

What Lead Time Measures
Official definition:
Working days from purchase order confirmation to ex-factory date. "Ex-factory" means goods are finished, inspected, packaged, and ready for pickup by freight forwarder.
What lead time includes:
Fabric and trim procurement
All cutting and sewing production
Decoration application (embroidery, printing)
Washing and finishing treatments
Quality inspection at multiple checkpoints
Packaging and labeling
Final AQL inspection and documentation
What lead time excludes:
Sampling time before PO (add 2-4 weeks)
International freight transit (add 2-4 weeks for air, 4-6 weeks for sea)
Customs clearance (add 3-7 days)
Domestic delivery to your warehouse (add 1-3 days)
Common Starting Point Confusion
Buyer thinks lead time starts from:
Initial inquiry date
Sample request date
Sample approval date
Payment deposit date
Lead time actually starts from:
Purchase order confirmation with approved specifications
Before PO, we are still in negotiation and sampling phase. Clock does not start until both parties commit to specifications and commercial terms.
Working Days Versus Calendar Days
Our 4-week lead time means 25-30 working days, not calendar days.
Excluded days:
Weekends (typically Saturday-Sunday)
National holidays in manufacturing country
Factory closure periods (Chinese New Year, etc.)
Example timeline impact:
PO issued January 15. Standard 4-week lead time = 25 working days. Chinese New Year falls February 1-10 (10 calendar days, 8 working days lost). Ex-factory date becomes February 28, not February 12. Appears like 6-week lead time but is actually 4 working weeks.
I tell buyers to request factory holiday calendars when placing orders. Plan around major holidays or accept extended lead times during those periods.
What Actually Happens Week by Week and What Cannot Be Accelerated?
Each production week addresses specific quality risks through mandatory testing and approval gates. Premium pricing can eliminate idle time between stages but cannot compress activities with inherent duration requirements.

Week 1: Fabric and Material Preparation
Day 1-2: Fabric procurement and inspection
Mills deliver ordered fabric to factory. Incoming inspection checks yardage, weight (GSM), and defects. If fabric has issues (wrong weight, excessive defects, color variation), we reject and reorder—this extends lead time by 5-7 days.
Cannot be compressed: Fabric transit from mill to factory, inspection protocol
Day 3-4: Lab dip approval for color accuracy
Factory dyes small fabric samples (lab dips) and sends to buyer for color approval. Courier takes 1-2 days. Buyer reviews and approves. If colors are off, factory adjusts dye formula and repeats.
Cannot be compressed: Courier transit, buyer review time, dye chemical reactions
Day 5-7: Pre-shrinking and stabilization
Most knit fabrics shrink 3-7% during first wash. We pre-shrink fabric through relaxation or mechanical treatment before cutting. This prevents finished garments from shrinking out of size specifications after customer washes them.
Cannot be compressed: Fabric relaxation process requires 48-72 hours for dimensional stability
This week has minimal visible progress from buyer perspective. No cutting or sewing happens. But skipping these steps causes the defects we saw in the rushed order example: wrong colors, unexpected shrinkage, size inconsistency.
Week 2: Cutting, Pattern Preparation and Setup
Day 8-10: Pattern grading and marker making
Approved patterns are graded across size range (S, M, L, XL, XXL). Markers (cutting layouts) are created to optimize fabric utilization and minimize waste.
Day 10-12: Fabric cutting
Fabric is spread in layers (typically 10-20 layers for small batches, 50-80 layers for large batches) and cut according to marker. All pieces are bundled by size and component (fronts, backs, sleeves, collars).
Day 13-14: Fusing and interlining preparation
Collar and placket pieces receive fusible interlining through heat and pressure. This stabilizes knit fabric in areas requiring structure. Improper fusing causes collar twisting and placket puckering.
Day 13-14: Embroidery setup and test runs
Logo files are loaded into embroidery machines. Technicians run test samples to verify logo placement, size, and tension. Multiple tests ensure consistent quality across production run.
Cannot be compressed: Proper fusing requires specific time/temperature parameters. Embroidery testing prevents mass production mistakes.
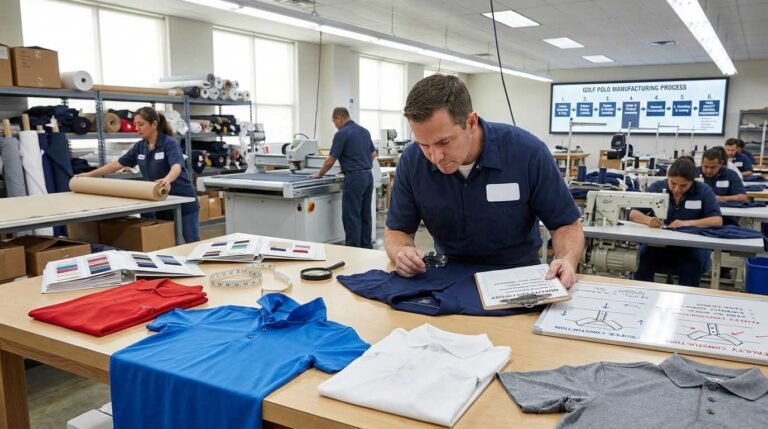
Week 3: Sewing, Assembly and Decoration
Day 15-18: Main assembly sewing
Collars, plackets, sleeves, and body panels are sewn according to construction sequence. Each garment passes through 15-25 workstations depending on complexity. In-line quality checkers inspect at key stages.
Day 18-20: Decoration application
Embroidered logos are applied. Screen printing or heat transfer (if used) happens during this window. Decoration defects (misalignment, poor tension, incomplete transfers) are caught and corrected.
Day 20-21: In-process inspection
Quality team performs random inspections checking construction quality, measurement accuracy, and decoration placement. Defects trigger line corrections before continuing.
Cannot be compressed: Complex assembly requires sequential steps. Each workstation depends on previous station completion. Rushing sewing increases defect rates from 2-3% to 8-12%.
Week 4: Finishing, Packaging and Final Inspection
Day 22-23: Washing and finishing
Garments are washed (if specified), pressed, and undergo final finishing. Loose threads are trimmed. Buttons are verified.
Day 23-24: Packaging and labeling
Garments are folded, polybags are applied, hang tags and labels are attached. Cartons are packed and labeled with shipping information.
Day 25-26: AQL inspection
Third-party or internal QC team performs AQL (Acceptable Quality Limit) inspection. Random sample is pulled and inspected against specifications. Defect categories are measured. Orders with defect rates above acceptable limits (typically 2.5-4.0%) require rework.
Day 26-27: Documentation and ex-factory preparation
Packing lists, commercial invoices, and certificates (if required) are prepared. Goods are staged for freight pickup.
Cannot be compressed: Final inspection requires time proportional to order size (6-8 hours for 1,000 pieces). Documentation must be accurate to prevent customs delays.
Why Fabric Procurement and Testing Take a Full Week and What Breaks When Skipped?
Fabric procurement and color approval consume 30-35% of total lead time because textile consistency issues are the highest frequency defect category—accounting for 40-50% of order rejections I have witnessed in five years.

Why Fabric Cannot Be Pre-Stocked
Buyers often ask: "Why do you need a week for fabric? Just keep it in stock."
Fabric stocking challenges:
Color matching: Each brand has specific color requirements. Stocking every possible color across every fabric type is impossible.
Fabric variety: Different customers need different blends (100% polyester, poly-cotton, cotton-spandex), weights (140-180 GSM), and finishes (moisture-wicking, UV protection).
Minimum order from mills: Fabric mills have MOQs (typically 500-1,000 yards per color). Factories cannot stock every variation.
Inventory risk: Fabric sitting in warehouse ties up capital. Knit fabrics can degrade in quality over 6-12 months if not stored properly.
Lab Dip Process and Importance
What are lab dips:
Small fabric swatches (10cm × 10cm) dyed using proposed production dye formula. Sent to buyer for approval before bulk fabric dyeing.
Why lab dips matter:
Dye lot variation: Even "standard" colors like navy or black vary between dye lots. Lab dips confirm the exact shade.
Lighting conditions: Colors appear different under various lighting (daylight, fluorescent, incandescent). Buyers verify colors under their target lighting.
Brand consistency: Ensures new production matches previous orders or reference standards.
Lab dip timeline:
Factory dyes lab dip: 1 day
Courier to buyer: 1-2 days
Buyer review and approval: 1-2 days
Adjustments if needed: repeat cycle
Most orders require 1-2 lab dip rounds. Rushing or skipping this creates the color mismatch problem from the example above.
Pre-Shrinking and Dimensional Stability
Why knit fabrics shrink:
Knit construction has inherent stretch. When fabric is knitted, dyed, and finished, it holds residual tension. First wash releases this tension causing shrinkage.
Pre-shrinking methods:
Relaxation: Fabric rests for 48-72 hours in controlled humidity allowing natural relaxation.
Mechanical: Fabric passes through relaxing machines or steam chambers accelerating dimensional stabilization.
Cost of skipping pre-shrinking:
I saw an order where factory skipped pre-shrinking to save 2 days. Finished garments measured to specification before washing. After customer washing, medium sized shirts measured like smalls—6% shrinkage. Buyer had to mark down entire inventory. Their margin disappeared.
Pre-shrinking takes time but prevents this exact scenario. Cannot be accelerated without accepting size inconsistency risk.
How Cutting, Sewing and Quality Checkpoints Consume Two Weeks and Why Parallel Processing Has Limits?
Sewing and assembly consume 40-45% of total lead time because apparel construction is inherently sequential with mandatory quality gates positioned between stages to catch defects before they multiply across entire batch.

Why Sewing Cannot Be Parallelized
Sequential operation requirements:
Cannot attach sleeves before shoulder seams are closed
Cannot sew collar before collar is constructed and pressed
Cannot apply logos before panels are assembled
Cannot hem before side seams are sewn
Each operation depends on previous operations completing. This is physical construction logic, not optional workflow.
Line balancing:
Sewing lines are balanced so each workstation takes approximately equal time. If collar station takes 90 seconds and sleeve station takes 95 seconds, you cannot accelerate beyond the slowest station.
Adding workers to fast stations does not help—creates backlog at slower stations.
In-Process Quality Control Gates
Why quality checks happen during production, not only at end:
Early defect detection: Catching construction errors at workstation 8 prevents adding work to defective garments through remaining 12 workstations.
Root cause correction: If quality checker finds systematic defect (wrong stitch type, incorrect measurements), production line stops and corrects before continuing. Catching this after 500 pieces are sewn means reworking all 500.
Operator feedback: Immediate quality feedback helps operators adjust technique preventing defects from repeating.
Typical quality checkpoints:
After collar construction (verify symmetry and dimensions)
After placket attachment (verify alignment and topstitching)
After shoulder seams (verify symmetry and measurement)
After sleeve attachment (verify setting and measurement)
After side seams (verify body dimensions)
Before finishing (complete measurement verification)
Each checkpoint adds 15-30 minutes to the production timeline but prevents defects that would cost 10-50x more to fix after completion.
Why Rush Sewing Increases Defect Rates
Normal production pace: Operators sew at comfortable speed maintaining quality standards. Typical defect rate: 2-4% of production.
Rushed production: Operators pressured to accelerate. Quality checks reduced or skipped to save time. Defect rate: 8-15% of production.
Real cost comparison:
Normal pace: 1,000 pieces, 30 defects (3%), 970 sellable units
Rushed pace: 1,000 pieces, 100 defects (10%), 900 sellable units
Rushing "saves" 3-4 days but loses 70 sellable units. At $13 cost per unit, that is $910 in wasted production plus potential customer disappointment if defects pass inspection.
I tell buyers that quality and speed have inverse relationship beyond certain threshold. Our 4-week timeline operates at the optimal balance point.
What Final Inspection Actually Protects You From and Why It Needs Two Full Days?
Final inspection and packaging consume final 2 days of lead time because this is the last defect capture gate before goods become your financial responsibility—typically catching 2-4% defect rates that would otherwise reach your customers.

What AQL Inspection Covers
AQL (Acceptable Quality Limit) definition:
Statistical sampling method that pulls random samples from production batch and inspects against specifications. Determines if entire batch meets quality standards.
Typical AQL levels for apparel:
Critical defects: 0% acceptable (safety issues, cannot be sold)
Major defects: 2.5% acceptable (affects usability or appearance significantly)
Minor defects: 4.0% acceptable (cosmetic issues that do not affect function)
Inspection categories:
Measurements: Verify chest, length, sleeve dimensions match specifications within tolerance (typically ±2-3%)
Construction quality: Check seam strength, stitch integrity, button attachment
Appearance: Verify colors match approved samples, no staining or fabric defects
Decoration: Confirm logo placement, size, and execution quality
Packaging: Verify labels, hang tags, polybags, folding meet requirements
Why Inspection Cannot Be Rushed
Sample size requirements:
500-piece order: 50 pieces inspected (10% sample)
1,000-piece order: 80 pieces inspected
2,000-piece order: 125 pieces inspected
Each piece requires 4-6 minutes of thorough inspection. 80 pieces × 5 minutes = 400 minutes (6.7 hours) of pure inspection time.
Additional time requirements:
Pulling random samples from packed cartons: 1-2 hours
Measurement verification with tools: adds 30-60 seconds per piece
Documentation and reporting: 1-2 hours
Identifying defect patterns if issues found: 1-3 hours
Total: 8-12 hours for 1,000-piece order, typically spanning 1.5-2 days with breaks and documentation.
Cost-Benefit of Final Inspection
Inspection cost:
$150-$300 for 500-1,000 piece orders (third-party)
$0-$150 for internal inspection (cost absorbed by factory)
Defects typically caught:
2-4% of production with fixable issues
0.5-1% with unfixable issues requiring replacement
Value protected:
1,000-piece order at $13 cost = $13,000 total value
3% defect capture = 30 pieces = $390 in prevented waste
Plus prevented customer complaints and returns
Skipping $200 inspection to save 1 day risks $400-$1,000+ in defect-related losses. This is negative-ROI decision.
How Can You Legitimately Reduce Lead Time Without Quality Compromise?
Lead time reduction of 15-25% is achievable through strategic planning—pre-approving fabric swatches, maintaining proven patterns, using platform fabrics, and building reorder relationships—without eliminating mandatory testing windows that protect quality.

Pre-Approved Fabric Programs
How it works:
Buyer reviews and approves 5-10 fabric options from factory's available inventory before needing them for specific orders. When order is placed, fabric approval step is eliminated—saving 3-4 days.
Requirements:
Buyer must review physical fabric swatches in advance
Pre-approval valid for 6-12 months (fabric inventory turnover period)
Works best for buyers with predictable reorder patterns
Pattern Library and Proven Designs
First order:
Pattern development and fit sampling adds 2-3 weeks before production lead time starts
Reorders with proven patterns:
Pattern on file, proven fit, no sampling needed
Production lead time starts immediately
Saves 2-3 weeks on total timeline
This is why I encourage buyers to start with fewer styles and reorder successfully tested designs rather than constantly developing new patterns.
Platform Fabric Strategy
Custom fabric selection:
Requires mill sourcing, lead time 10-14 days, lab dips needed
Total fabric preparation: 7-10 days
Platform fabrics (factory stocks):
Already in inventory or reliable 3-4 day delivery from partner mills
Colors proven and documented
Fabric preparation: 2-3 days
Choosing platform fabrics reduces Week 1 timeline by 4-5 days. For 4-week lead time, this enables 3-week completion without quality compromise.
Advance Order Placement
Standard approach:
Wait until inventory is low, then place order
Rush requests common, premium pricing
Strategic approach:
Place orders 60-90 days before needed
Factory schedules production in optimal windows
Eliminates all rush premiums
Allows buffer for unexpected delays
Most lead time pressure comes from poor planning, not manufacturing constraints. Buyers who plan 90 days ahead rarely need rush services.
What Cannot Be Accelerated (Ever)
Some buyers offer significant premiums for impossible timelines. I refuse these requests because no premium changes physics:
Fabric dyeing and drying: 3-5 days minimum (chemical processes and drying time)
Lab dip courier and approval: 3-4 days minimum (physical transit cannot be eliminated)
Pre-shrinking and stabilization: 2-3 days minimum (fabric relaxation is time-dependent)
Final inspection for 1,000+ pieces: 1.5-2 days minimum (physical inspection takes time)
Promising acceleration beyond these limits means either skipping steps (quality risk) or lying to customer (relationship risk). I prefer being honest about constraints.
Conclusion
Quality polo shirt production requires 4 weeks because each week addresses distinct defect categories through mandatory checkpoints: fabric consistency and color accuracy (Week 1), pattern precision and cutting accuracy (Week 2), construction quality and assembly integrity (Week 3), finishing standards and compliance verification (Week 4)—with legitimate acceleration possible through pre-approved fabrics, proven patterns, and advance planning but never by eliminating testing windows that prevent the 8-15% defect rates common in rushed production timelines under 3 weeks.