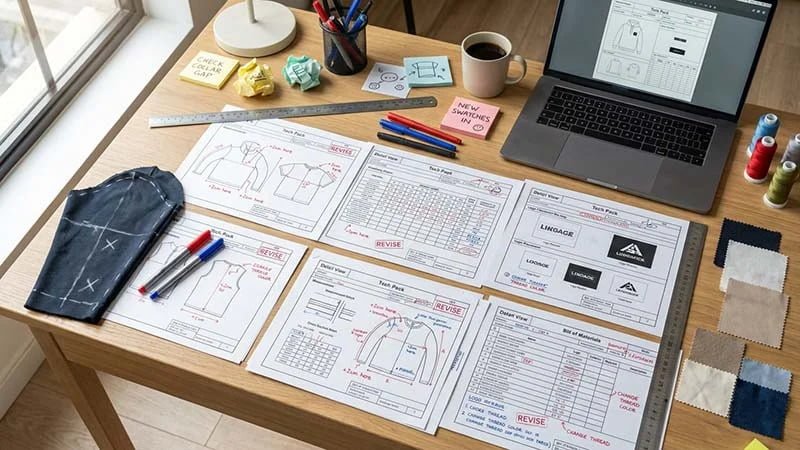
.png)

Your samples miss the mark. Costs creep. Deadlines slip. The root cause is vague direction. A clear, modular tech pack turns doubt into action and protects fit, function, and margin.
Build one modular tech pack that covers design, specs, grading, BOM, construction, decorations, testing, packaging, and version control. Add golf-specific swing zones, dynamic ease, and lab standards. This single file drives speed, quality, and repeatability.
I learned this in real production. I stopped sending loose sketches and emails. I wrote one source of truth. I tracked every change. I defined tests, not wishes. Samples started to match. Lead time fell. Let me show you how I set it up and keep it tight.
What is a Tech Pack & Why is it Essential?
You have a clear vision. The factory does not. They need facts, not feelings. They need one document that closes every gap.
A tech pack is your manufacturing blueprint. It defines what to make, how big to make it, which materials to use, how to build it, how to decorate it, how to test it, and how to pack it.

Definition & Key Functions of a Tech Pack
I treat the tech pack as contract, cost base, and quality yardstick. It aligns design, pattern, cutting, sewing, and QC. It records every approved change. It stops “I thought you meant…” moments. It also speeds costing because the BOM is precise.
- Core functions and why they matter:
| Function | What I Include | Why It Matters |
|---|---|---|
| Communication | Flat sketches, POM diagram, photos | Removes guesswork on shape and detail |
| Costing | Full BOM with supplier refs | Enables accurate quotes and MOQ planning |
| Quality | Specs, tolerances, AQL plan | Clear pass/fail at PPS and bulk |
| Legal/Change | Version log with redlines | Locks decisions and prevents disputes |
Unique Importance for Golf Apparel Production
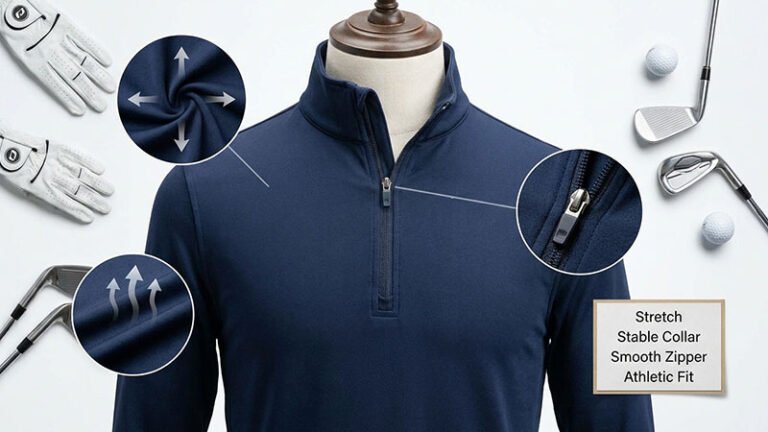
Golf apparel is technical gear. Fit supports a swing. Fabrics must wick, stretch, and protect from UV. Construction often uses bonding, taping, silicone, or laser holes. I write swing zones into the pack (shoulder, underarm, back). I set dynamic ease at chest and waist. I add machine settings for transfers and tapes. This converts features into repeatable production rules that save time, cost, and stress.
Essential Sections of a Golf Apparel Tech Pack?
You think one page is enough. It is not. Small gaps become big rework. One complete structure prevents misses.
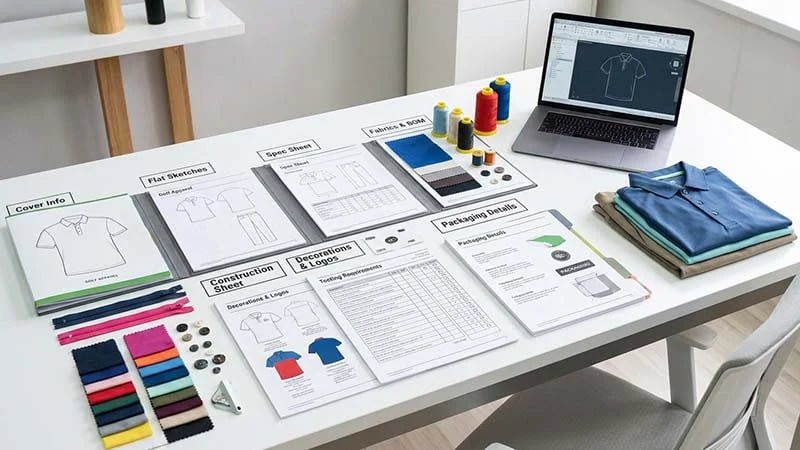
Use a modular layout: cover info; fabrics and colors; fit, specs, and grading; construction and process; trims and decorations; testing and acceptance; packaging and logistics; version and annotations. Each block answers one core question.
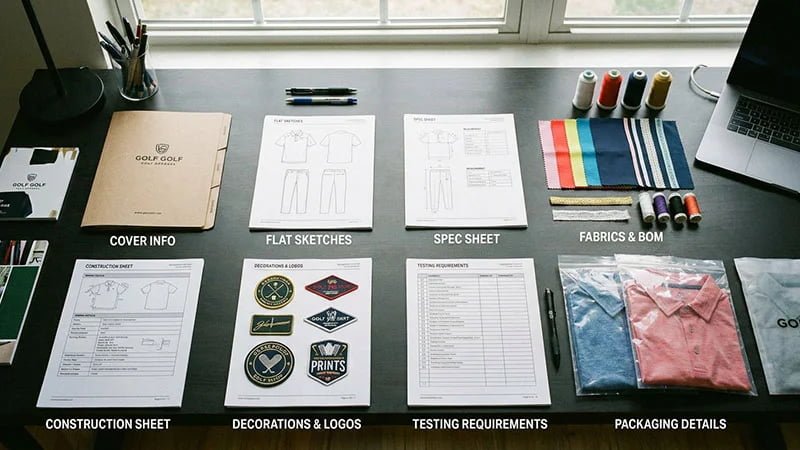
Cover Page & Project Info
I list style name/number, season, base fit, sample size, and markets. I add a color thumbnail. I show a version table (V1/V2/V3) with dates, owners, and change notes.
Flat Sketches (Front/Back/Details)
I include clean front/back flats and callouts for placket, collar, vents, gussets, perforations, taping, and silicone prints. No stylized art. Only clear technical lines.
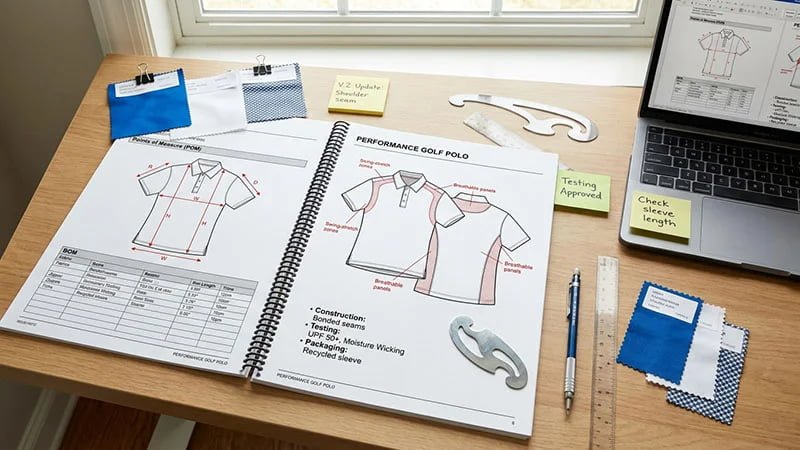
Spec Sheet & Measurement Methods
I include a POM list with “how to measure” diagrams. I set sample specs, grading, and tolerances. I add action POMs like scapula width, sleeve cap height, underarm gusset length, side slit length, and dynamic ease.
Fabrics, Trims & Bill of Materials
I name every item with supplier, article number, color, finish, and placement. I include test needs per fabric line, like UPF and wicking.
Construction Sheet & Process Notes
I define seam type, SPI, seam allowance, reinforcements, and bonding settings. I attach mini stitch diagrams or photos for tricky zones.
Decorations & Logo Application (Embroidery, HT)
I specify logo size, Pantone, XY placement, and method. For heat transfer, I list temp, pressure, time, and peel method. For embroidery, I note thread type and backing.
Labels/Tags/Packaging Requirements
I show label artwork and placement. I define fold, polybag, barcode, carton, and pack count. I add carton test if needed.
- Module summary at a glance:
| Module | Core Question | Example Entry |
|---|---|---|
| Cover | What is this style? | Polo SS24, V1.2, USA fit |
| Specs | How big? | Chest 56.5 cm, tol ±0.7 cm |
| BOM | Use what? | 190gsm poly/spandex jersey |
| Construction | How to build? | 4-thread OL, 10–12 SPI |
| Decorations | How to brand? | HT 60 mm, Pantone 2995C |
| Testing | Pass what bar? | UPF ≥ 40; AATCC 197 pass |
| Packaging | How to ship? | Tri-fold, L poly, 40 pcs/carton |
| Version | What changed? | V1→V2: sleeve cap -0.5 cm |
Golf Apparel: Key Considerations & Extras?
Great photos sell once. Real performance drives repeat buys. I write function as numbers, not wishes.
Translate features into test methods and targets. Mark swing zones and dynamic ease. Define regional fits. Lock compliance early. Set machine settings so bulk matches PPS.
Performance Features (Wicking, UPF, Anti-bacterial)
I map each claim to a test and a target. I avoid vague words like “great wicking.” I use lab language and levels.
| Feature | Standard | Target I Use |
|---|---|---|
| Wicking | AATCC 197 | Vertical >10 cm/5 min |
| Quick Dry | AATCC 134 | Dry time ≤ X min after wash |
| UPF | AATCC 183 | UPF ≥ 40 |
| Anti-Pilling | ASTM D4970 | Grade ≥ 4 after 2,000 cycles |
| Sweat Fastness | ISO 105-E04 | Grade ≥ 4 |
| Snag Resistance | Mace / Brand spec | Pass internal threshold |
Specialty Trims (Seam Taping, Laser Perforation, Silicone Printing)
I document tape model, temp/pressure/time, and nozzle width. For laser holes, I set hole diameter and pitch. For silicone, I note shore hardness, pattern, cure, and wash test. These settings make the look and hand feel consistent across sizes and lots.
Golf Fit Details (4-Way Stretch, Sleeve/Body Length, Regional Fit)
I add three-view pose sketches: address, top, finish. I set dynamic chest/waist ease, sleeve cap height, shoulder-to-underarm arc length, scapula width, and side slit length. I document US/EU vs Asia fit deltas. I state “base size L USA; grade rules ± at chest/waist/sleeve” so the factory does not guess.
Testing & Compliance Instructions
I call out REACH and Prop 65 if needed. I list accredited labs. I state who pays, when to test (fabric stage, PPS, bulk), and how many samples. I add AQL, gold sample retain, and carton drop test if required. I keep all reports linked in the pack.
Common Pitfalls & How to Avoid Them?
Small gaps cause big delays. I close them before sampling starts.
Fix omissions, set tolerances, and control versions. Confirm BOM feasibility early. Invite factory process input. Then lock changes in a visible version log with photos.
Common Omissions Checklist (Specs, Grading, Stitch Diagrams, etc.)
- Frequent misses and my fixes:
| Risk | What Goes Wrong | My Fix |
|---|---|---|
| No POM diagram | Wrong measuring method | Arrowed diagrams per POM |
| Missing grading | Sizes drift off base | Grade rules per size jump |
| No tolerances | QC disputes | Garment tol ±0.5–1.0 cm; tighter at key points |
| Vague stitches | Weak seams | Name stitch, SPI, allowance, reinforcement |
| No process mini-diagrams | Misbuild | Add photos or micro sketches |
| Unset logo settings | Cracks/peel | Temp/pressure/time + peel |
| No change log | Confusion | V1/V2/V3 with owner and date |
Key Points to Clarify with Suppliers
I ask three things early. Can you source the BOM or propose equals with swatches and data? Do you see a simpler build that keeps function? What are MOQs and lead times by item? I confirm AQL, PPS approval gates, and gold sample retain. I agree on carton size and pack count to avoid last-minute freight surprises.
Real-World Examples & Best Practices?
Theory is nice. Samples tell the truth. I turn lessons into rules that live in the pack.
Show, test, adjust, record. Use a fit base or reference. Redline photos. Measure against specs. Convert feedback into the next version. Keep every change in one place.
Solid Tech Pack Sample Walkthrough
My ideal polo pack has 18–24 POMs. It covers HPS-to-hem, armhole curve, sleeve muscle, sleeve cap height, side slit, and collar stand height. Construction notes say: “Shoulder: 3T overlock + clear elastic; SPI 10–12.” Logos list Pantone, size, XY coordinates. Heat transfer reads: 150–160°C, 8–12 s, 4–5 bar, cool peel. The BOM cites supplier articles. I attach PPS photos next to the change table so QA and production see cause and effect.
Common Brand/Designer Mistakes
- “Use soft fabric” with no spec
- No dynamic ease for swing
- Missing grading and tolerances
- Logo art listed but no process settings
- Changes scattered in chats, not logged in the pack
Manufacturer Feedback Cheat Sheet
- Decode feedback and respond fast:
| Factory Says | Read It As | My Response |
|---|---|---|
| “This construction is difficult.” | Slow and costly | Offer a simpler seam or bonding that keeps the look |
| “MOQ is high for this fabric.” | Not viable at your qty | Switch to stock fabric or combine styles to meet MOQ |
| “Please send a reference.” | Fit/hand unclear | Ship a base sample with notes and POMs to match |
| “Print cracks at wash.” | Settings off | Adjust temp/time/pressure; retest and update the pack |
Tech Pack Preparation Checklist?
You are close. One last sweep can save a season.
Run a final pass on every module. Confirm tests and settings. Lock V1.0. Share one file only. Keep a gold sample and all reports linked.
Step-by-Step Content Checklist
- Cover: style, season, base fit, sample size, version table
- Flats: front/back plus detail callouts
- Specs: POM list, diagrams, tolerances
- Grading: size range and grade rules
- BOM: suppliers, article numbers, colors, finishes
- Construction: stitch, SPI, allowances, reinforcements, bonding settings
- Logos: Pantone, size, XY placement, process settings
- Performance: wicking, UPF, pilling, sweat fastness targets
- Compliance: REACH/Prop 65 plan and lab
- QA: AQL, PPS gate, gold sample retain, test schedule
- Packaging: fold, poly, carton, barcode, pack count
- Version control: redlines, photos, change log V1/V2/V3
Template Files & Downloads
I keep a simple tool stack. Illustrator for flats and callout library. Excel for specs, grading, and BOM tabs. A master PDF that merges modules and locks layout. An appendix with test methods and AQL tables. A folder with PPS photos and lab reports. Simple tools work if you stay strict and update versions after every approval.
- AI: reusable flats and arrows
- XLSX: POM, grading, BOM
- PDF: construction pages with mini diagrams
- Appendix: lab methods and acceptance levels
- Folder: PPS photos, gold sample, and reports
Frequently Asked Questions?
You asked for quick, clear answers. Here are the five I get most often.
These answers are practical. They come from real sampling rooms. Use them to move faster and avoid costly do-overs.
1) Do I need a full tech pack for a small run?
Yes. Small runs suffer most from mistakes because there is no buffer to fix them. A complete pack saves time, trims waste, and protects margin even at low MOQs.
2) Which comes first, fabric or fit?
I define the fit first, then pick a fabric that meets the test targets. I confirm stretch, recovery, and weight against the fit. I avoid changing both at once.
3) Can the factory write the tech pack for me?
They can help, but I own the document. It is my recipe. I accept process suggestions, yet I keep the specs, tests, and fit rules under my control to protect consistency.
4) How do I handle updates after the first sample?
I measure the sample, mark photos with redlines, and list changes in the log. I update the pack and save a new version number. I send one file only to avoid confusion.
5) What kills timelines most often?
Late BOM swaps, missing grading, undefined logos, and no test targets. I lock the BOM early, set grade rules, specify Pantone and process settings, and list lab standards in V1.0.
Conclusion
Write once, test and verify, then lock. A modular, test-driven tech pack turns ideas into repeatable quality and keeps your samples, timelines, and margins on track.