You sent your factory a beautiful design file, but the sample you got back is completely wrong. The fit is off, the fabric feels cheap, and the logo is in the wrong place. Now you're facing costly rework and frustrating delays.
A detailed tech pack is not a design file; it is a manufacturing contract and a risk-control checklist. It translates your design vision into a precise technical blueprint that leaves no room for guessing, ensuring your factory builds the exact product you want, the first time.

The most expensive mistake a new brand owner can make is sending an incomplete set of instructions to a factory. I see it every week. A founder like Bobby sends me a JPEG and asks for a quote. I have to reply with a dozen questions: What fabric weight? What's the measurement for the chest? What kind of stitch for the hem? Every question is a day lost. Every guess the factory has to make is a risk you can't afford. A tech pack is your single most important tool for communicating your vision and protecting your investment. This guide will break down exactly what goes into one and why each part is critical.
What Are the Sections of a Professional Polo Tech Pack?
Cover sheet
This is the executive summary. It includes a flat sketch of the polo (front and back), the unique style code, the season it's for, the fabric name, the list of colorways, the size range you'll be producing (e.g., S-XXL), and a brief description of the intended fit ("Athletic Fit," "Regular Fit").
File structure and naming
This is critical for avoiding confusion. Every version of your tech pack should have a clear version number and date (e.g., Style101_CorePolo_TechPack_v1.2_2024-10-26.pdf). A change log on the first page should track every single revision, who requested it, and when it was approved.
Measurement condition
For a knit polo, you must specify that all measurements should be taken after the garment has been washed and dried once according to a standard like AATCC 135. This accounts for the natural shrinkage of the fabric. Failing to specify this is a common rookie mistake that leads to samples that are too small.
Visual index
This page gives the factory a quick overview. It should have a diagram showing all the Points of Measure (POMs), a map showing where different stitch types are used, and a map for artwork placements.
Free template contents
Our free template will provide you with the essential tables and pages you need to fill in: the main size spec table, the Bill of Materials (BOM) sheet, detailed callout pages for construction, a matrix for quality control and testing, and pages for label placement and packaging instructions.
How Do You Define and Specify Sizes Correctly?
You have a general idea of the fit you want, but how do you translate that "feeling" into hard numbers that a factory can actually produce consistently across five different sizes?
You must provide a detailed size specification chart with clear Points of Measure (POMs), a target measurement for your base size (e.g., Medium), and precise grading rules that dictate how each measurement should increase or decrease for other sizes.

"My sample doesn't fit right" is the number one complaint from new brands. The cause is almost always an incomplete or ambiguous size spec sheet. Providing clear measurements, tolerances, and grading rules is the only way to ensure your Small fits like a Small and your XL fits like an XL.
Core POMs
These are the non-negotiable measurements every polo tech pack must have.
- HPS Length: Garment length measured from the High Point Shoulder.
- Chest: Measured 2.5 cm (1 inch) below the armhole, from side seam to side seam.
- Shoulder: Measured across the back, from shoulder point to shoulder point.
- Sleeve Length & Opening: Measured from the shoulder seam to the hem and the width of the cuff opening.
- Hem Sweep: The total width of the bottom hem.
- Collar Width & Placket Length: Critical details for a sharp look.
Base size spec
You need to provide the exact measurements for one base size, usually a Medium. For a Men's Regular Fit polo in Size M, the chest might be 54 cm and the HPS length might be 74 cm.
Tolerances
No two garments will be exactly identical. You must specify an acceptable tolerance for each measurement. For major POMs like the chest, a tolerance of ±1.0 cm is typical. For smaller, more critical details like the placket length or collar width, the tolerance should be tighter, like ±0.5 cm.
Shrinkage plan
Knit fabrics shrink. Your tech pack should state the target shrinkage percentage (e.g., "max 5% in length after one wash per AATCC 135"). The factory's pattern maker will then add this amount to the pattern pieces to compensate, so the garment measures correctly after it's been washed.
Grading rules
Grading is the process of creating the specs for all other sizes based on your base size. A standard grading rule for the chest might be "+2.5 cm" for each size up (M to L) and "-2.5 cm" for each size down (M to S).
Size set protocol
Before you approve bulk production, you must order a "size set"—one sample in every size you plan to produce. You need to measure each one and have different-sized people try them on to confirm your grading rules work in practice.
What Goes Into the Bill of Materials (BOM)?
You've picked a great fabric, but what about the buttons, the thread, and the labels? How do you ensure every single component of your polo is exactly what you want?
The Bill of Materials (BOM) is a comprehensive list of every single physical item required to build your finished product. For each item, you must specify the supplier, item code, color, size, and placement. An incomplete BOM is a direct invitation for the factory to substitute cheaper materials.

This section is where many new brands get into trouble. They specify "100% polyester pique" but fail to specify the weight (e.g., 180 gsm), the finish, or the supplier. The factory then sources the cheapest option that meets the vague description, and the brand is disappointed with the hand-feel. Your BOM must be obsessively detailed.
Fabric
Specify the exact composition (e.g., 92% Polyester / 8% Elastane), weight (e.g., 180 gsm), structure (e.g., Micro-Piqué), and any performance finishes. Include the exact color code (e.g., Pantone 19-4026 TCX Nautical Blue).
Collar and cuffs
If your collar is a separate knit rib, specify its composition (e.g., 1x1 Rib) and weight. This is crucial for preventing the collar from looking flimsy or curling after washing.
Placket and interlining
For a sharp, structured placket, you need to specify the fusible interlining to be used inside it (e.g., "25 gsm lightweight fusible interlining"). Specify the number of buttons, their size (e.g., "16L"), and their material.
Threads and needles
Yes, even the thread matters. Specify the thread type (e.g., Polyester Tex 24) and color matching rule ("match to main fabric"). For performance knits, you must specify a ballpoint needle (e.g., "75/11 Ballpoint") to prevent the needle from cutting the fabric yarns.
Labels and care
List every label: the main brand label, the size label, and the care/content label. For each one, specify the material, size, fold type, and exact placement location.
Packaging
The BOM extends all the way to the finished product. Specify the folding method, the use of any tissue paper, the polybag size and thickness, and any required warning notices on the bag. Include specifications for your carton markings and barcodes.
How Do You Specify the Construction and Stitching?
Your polo needs to withstand hundreds of golf swings and washes. How do you ensure it's built to last and doesn't fall apart at the seams?
Your tech pack must include a detailed construction page with a "seam map" that calls out the exact stitch type and stitches per inch (SPI) for every seam on the garment. You must also specify reinforcements, like bartacks, at all stress points.

The stitching is the skeleton of your garment. Using the wrong stitch type can lead to burst seams, puckering, or an unprofessional finish. I always tell my clients that this page is where you separate the amateurs from the pros. Showing you know the difference between a 504 and a 406 tells the factory you're serious about quality.
Seam map
Use a flat sketch of your polo to create a map. Call out the major seams and specify the stitch type.
- Shoulder and Side Seams: Use a 504 overlock stitch for strength and stretch.
- Hems: Use a 406 coverstitch for a clean, flat, and stretchy finish.
- Placket and Collar Set: Use a 301 lockstitch for a stable, non-stretch seam.
Stitches and density
For each stitch type, specify the Stitches Per Inch (SPI). For performance knits, a range of 9–12 SPI is typical. Too few stitches and the seam will be weak; too many and you can damage the fabric.
Placket build
Show a detailed diagram of the placket construction. Specify the width, the buttonhole length and density, and call out the placement of a reinforcing bartack at the bottom of the placket.
Collar construction
Detail how the collar is constructed and attached to the body. Call out if you want a topstitch for a cleaner look or a taped seam on the inside of the neck for added comfort.
Side slits and hems
If your polo has side slits, show how they should be finished. Specify the length of the slit and the placement of reinforcing bartacks at the top.
Quality notes
This is a great place to be proactive. Include photos of common defects you want to avoid, such as "seam grin" (where the thread is visible when the seam is stretched) or "tunneling" on the hem. This shows the factory your quality standard.
How Do You Control Your Branding and Artwork?
Your logo is your brand's signature. How do you ensure it's placed perfectly, in the right colors, and with the right method, on every single shirt?
Create a dedicated artwork page that acts as a blueprint for all branding. It must include a placement grid with exact measurements, detailed specifications for the application method, precise color codes, and file requirements for your artwork.

"The logo looks a bit off." This is a dispute I've seen countless times, and it's almost always because the tech pack lacked a precise artwork specification. You cannot be too detailed here. Specifying placement down to the millimeter and providing the correct color codes is the only way to guarantee consistency.
Placement grid
Show your logo placements on a flat sketch with precise measurements from fixed points. For example:
- Left Chest Logo: 35 mm height. Positioned 22 cm down from HPS and 8 cm from center front.
- Sleeve Logo: 25 mm height. Positioned 5 cm up from the sleeve hem.
- Placement Tolerance: Specify an acceptable tolerance, such as
±5 mm.
Methods
Be explicit about the application method.
- Silicone Transfer: Specify the thickness (e.g., 0.8 mm), durometer (hardness), and finish (matte or gloss).
- Embroidery: Specify the exact thread Pantone colors, stitch count or density, and the type of soft backing to be used so it doesn't irritate the skin.
- Prints: Specify the ink type (e.g., water-based, plastisol) and curing requirements.
Color and matching
Never say "blue." Always provide the exact Pantone TCX code for every color in your logo. For quality control, you can specify an acceptable Delta E color variance limit. On synthetic fabrics, you must demand anti-migration inks to prevent dye from the fabric from bleeding into your logo.
File specs
Specify the required file format for your artwork (e.g., "Vector AI or PDF with all fonts outlined"). This ensures the factory can scale your logo without losing quality.
Approval flow
Mandate an approval step for artwork before full production begins. The factory must provide a "strike-off" (for prints) or a heat-press test on a swatch of your actual bulk fabric for you to approve.
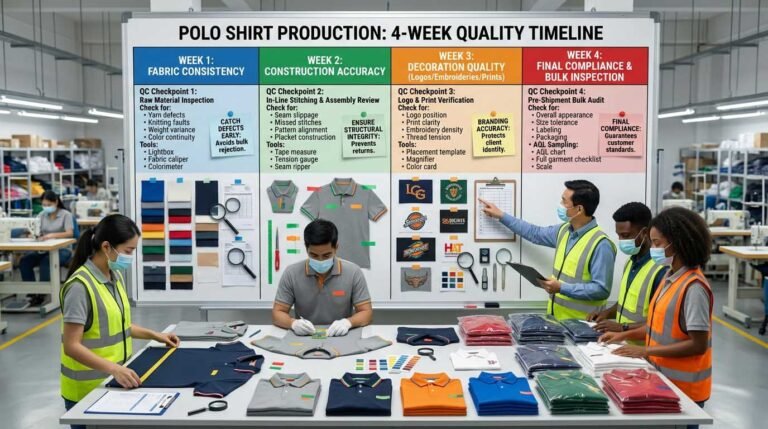
How Do You Manage Testing, Quality Control, and Approvals?
How do you verify that your polo not only looks good but also performs as advertised and meets your quality standards before you pay for thousands of units?
Your tech pack must include a testing and QC matrix that lists all required performance tests, the acceptable quality level (AQL), and the formal sample approval gates. This section turns your quality expectations into contractual requirements.

You can't inspect quality into a product at the end; you have to build it in from the beginning. This section of your tech pack tells the factory what your quality standards are and how you will be verifying them. It's your insurance policy against a batch of bad products.
Performance tests
If you make a performance claim, you must back it up with a test. List the required tests and standards:
- Wicking: AATCC 197
- Air Permeability: ASTM D737
- Snag Resistance & Pilling: ASTM D3939 & D4970
- Colorfastness: AATCC 16 (Light), 61 (Wash), 8 (Crocking)
- UPF: AATCC 183 or AS/NZS 4399 (Only if you claim it)
Shrinkage and twist
Specify the maximum allowable shrinkage and twisting of the garment after washing, tested according to AATCC 135/150.
AQL and inline QC
Specify your Acceptable Quality Level (AQL), which is the statistical measure of the maximum number of defective goods that is considered acceptable in a batch. AQL 2.5 is a common standard for apparel. You can also provide a checklist for the factory's own inline QC inspectors to use during production.
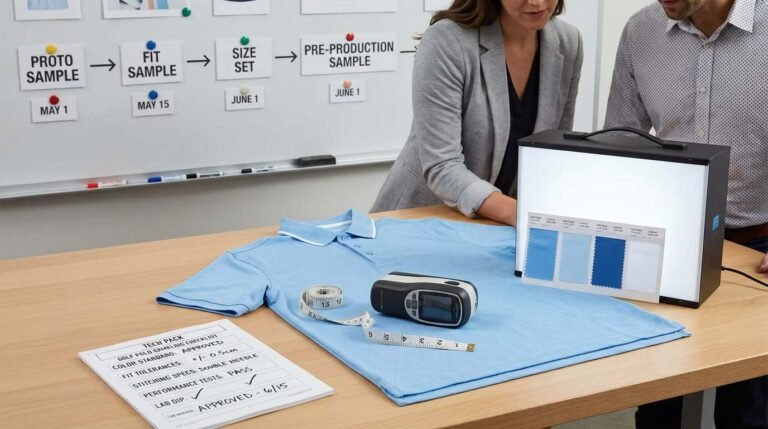
Sample gates
Formalize the sample approval process. Each sample serves a different purpose, and you must sign off on one before the factory proceeds to the next.
- Proto Sample: To check the basic construction and design.
- Fit / Size Set: To confirm your fit and grading across all sizes.
- PPS (Pre-Production Sample): The final, perfect sample made with all bulk materials. This is your "golden sample" that bulk production must match.
- TOP (Top of Production): A few units pulled from the very beginning of the production run to ensure nothing has changed.
Compliance
List all required compliance standards, such as labeling laws (FTC in the US), chemical restrictions (REACH, Prop 65), and any certifications for your materials (e.g., OEKO-TEX).
Documentation
Your tech pack should state that the factory must provide copies of all lab reports and that you will be archiving all signed approval forms and tech pack versions.
How Do You Ensure a Smooth Handoff and Manage Changes?
Your tech pack is finally complete. What's the best way to deliver it to the factory and manage the inevitable questions and changes that arise during development?
The handoff is a formal process. You must bundle the finalized PDF tech pack with all editable artwork files and graded patterns. Establish a clear communication log for questions and a strict change order process to control revisions and their impact on cost and timing.

Sending the tech pack is not the end of your job; it's the beginning of a conversation with your factory. How you manage this conversation will determine the success of your production run. Clear communication and disciplined change control are essential.
Hand-off bundle
Prepare a clean folder for your factory that includes:
- The final, locked PDF version of your tech pack.
- The original, editable artwork files (e.g., Adobe Illustrator).
- Digital pattern files (if you have them).
- Physical fabric and trim cards for them to match against.
Questions log
Instead of a messy chain of emails, use a shared spreadsheet as a Request For Information (RFI) log. List all questions, who is responsible for answering, the answer, and the date it was resolved. This creates a single source of truth.
Change orders
Changes will happen. When they do, you must be disciplined. Any change requires updating the tech pack version number, highlighting the change in red, and documenting it in the change log. A significant change to construction may require a new PPS to be made and approved.
Costing impacts
Make it clear in your process that any change requested after the initial quote may impact the cost. A change in the BOM or a construction detail that adds time will affect the final unit price. This prevents surprises on your invoice.
Production readiness
Before bulk production begins, hold a pre-production meeting with the factory (even over video call) to walk through the tech pack one last time and answer any final questions. This simple step can prevent countless misunderstandings.
Conclusion
A tech pack is more than a document; it's your most powerful tool for turning an idea into a high-quality, profitable product. Building a complete one takes time, but it saves you multiples of that time in rework, disputes, and delays. It is the blueprint for your success.